How To Install iOS 9.1 Beta 1 On Your iPhone

iOS 9.1 Beta 1.
The developer beta versions are deemed to be installed on test devices, simply because sometimes they’re too unstable to run on your primary iPhone. However, we’ve tested iOS 9.1 for a few days and it works pretty good. So, if you’re the adventurous type of Apple fan and wish to check out all the new emojis packed in this upcoming iOS version, here is how to install it even if you don’t own a developer account.
Step by Step Guide For iOS 9.1 Installation
Once again, be aware that you proceed at your own risk. Nevertheless, everything should be fine if you precisely follow the tips listed below:
 Step 1: Open iTunes on your computer and connect the iPhone with the help of the USB lightning cable.
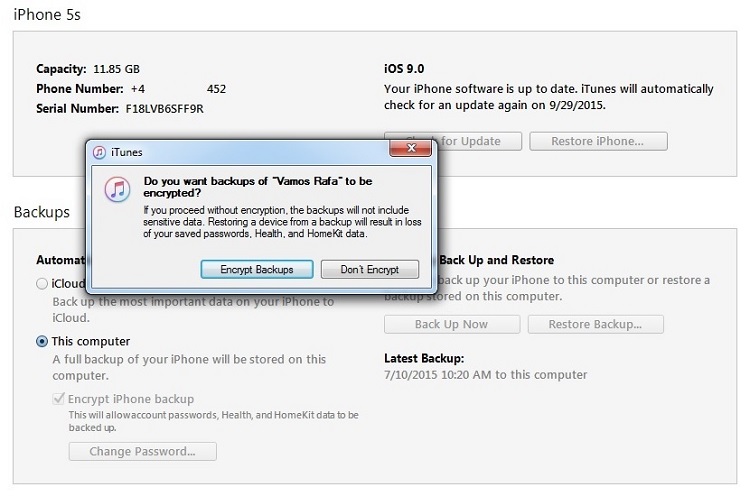
Step 2: Before starting the upgrade backup your iPhone on iCloud and preferably on your computer too. Make sure that you’re running the latest iTunes version, before backing up your device. If you wish not to lose HealthKit data (save your Apple Watch Activity history), encrypt your backup, by providing a Passcode when prompted.
 Step 3: Download the iOS 9.1 update package. Make sure that you select the version matching your device. To get the exact iPhone model that you won check the back of your device and get the smartphone’s code. For example iPhone 5S (A1533).
Fact: Do mind that download files can be up to 2GB large. You need at least 4 GB of free space on your computer in order to accommodate and remain with enough space for the installation process.
 Step 4: Unzip the iOS 9.1 update package, because you need the original “.ipsw” file to begin the upgrade process.
Step 5: Return to iTunes on your computer and press the Option key (on Mac) or Shift key (on Windows) + Click on Check for Update. Next, select the .ipsw iOS 9.1 update file and click Open.
Fact: Wait for around 10-15 minutes until the update is installed. Your iPhone will automatically reboot when the process finishes and you’ll be able to uncover the iOS 9.1 beta 1 update!