iPhone Contacts Creation Date Listing
Last updated on June 19th, 2020 at 09:44 am
Posted in Apps or Games, How To by Patricia on April 6, 2015If you work in the sales industry, run an important business or simply don’t want to accidentally call a new contact, while attempting to dial an old buddy, you might wanna add another filter to your iOS Contacts app!
Memory can be suddenly refreshed and confusions avoided, if you list your contacts by Creation Date, instead of doing it the regular way. When searching for a contact using the alphabetical listing, you can end up with a list of similar, if not identical, entries. If no other additional info like photo, secondary phone number or email is attached to the contact, you won’t be able to make the difference.
How To List Contacts by Creation Date
 A third party app called Contacts last entries & search (Free) allows you to search your iPhone contacts by the date they where created.
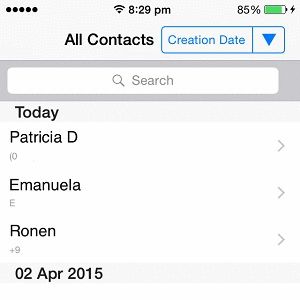
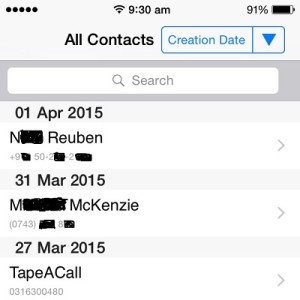
Simply, download & install the app from the App Store. Open the application and your Contacts are listed, similarly to the iOS built-in view. The only addition is that you can see the phone number below the name of the contact, for each entry.
Next, tap on Name, in the top right corner of the screen, and switch for the contacts Creation Date listing. Use the arrow to set ascending or descending display order!
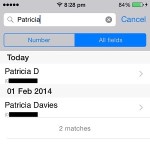
 Notice, in the nearby image, how helpful the creation date listing is. Although both entries have similar names and you don’t have any other fields that can help you to eliminate the confusion, you can clearly see that one of them was added today while the other one more than one year ago.
This way you can choose accordingly and avoid calling or texting the wrong person!
5 Tips To Avoid Confusion Between Similar Contacts
Viewing your contact entries order by creation date helps a lot, but you can make your life even more easier, if you spend a few extra seconds whenever you save a new contact. Here is what you have to do:
1. Eliminate Duplicate Contacts – In case you switch from Android to iOS, or upgrade to the latest iPhone, you risk of loading duplicate entries to Contacts. Get rid of them by merging or deleting identical entries!
2. Add Photo – If you have the means try to assign a photo to each contact. If you don’t have a profile picture, try to add anything related, that will help you identify your contact easier.
3. Complete Fields – When you save a contact try to complete as many fields as possible, including Company, Email, Related Name or everything else that will help you to identify the contact later on.
4. Add Nickname – Did you know that you can assign your friend’s nickname to its contact entry? Open the contacts page, tap Edit in the top right corner, scroll down to add field and select Nickname!
5. Save a Note – The same contact adding menu allows you to save a note. Type something like: ‘John is the plumber that successfully fixed a pipe back in 2013’, This way you’ll be sure that you won’t confuse the entry anymore.
Did you ever confuse iPhone contacts? Let us know in the comments section available below!
Related: How to share your photo with contacts in Messages. (Feature added in iOS 13)


Nope, ‘creation date’ doesn’t appear in Contacts at all… ????
Time you updated this article I think!
Helen, thanks for your comment. I just checked the feature for you.
The creation date tip shared above does work. Not sure if you read the article carefully. This is not a stock iOS feature. You need to download the free ‘iContacts+’ app, which is now called ‘Contacts last entries & search’.
The App Store link is available in the article.
Open the app and you can switch to the Contact Creation date list view, as described in the article.
I would like to search when a contact was entered into my list on my iPhone10
Thanks
Gary
Use the app mentioned in the article and you will be able to check when a contact was saved.
still working correctly and very helpful- thanks for the great tip
You’re welcome. Thanks for confirming.
I was using this app since 2014, it was sorting my contact perfectly.
recently I have noticed that it only sort out the last 5 months, older contacts will be all merged under (current date – 5 months)
I am not sure if this is an iCloud thing, iPhone issue or “contact Last Entry search issue”, I am exploring more options like.
Jamil, are you referring to the stock Contacts iOS app or the ‘Contacts last entries & search’ third party app?
I meant “Contacts last entries & Search” i think there might be a bug in iCloud that created date field to 7-Apr-2020, and anything before that date is just has 4-Apr-2020, the good news is that after this date my contacts are sortable
I downloaded the app but it only picks up and displays about 20 of my contacts.. the rest are simply not displayed. Anyone know why ?
Rob, just downloaded the app and tried it out. All my contacts are displayed on iPhone 11 Pro (iOS 14.1). I assume that you allowed access to your Contacts, right?
What iPhone model and iOS version are you using?
I am using IOS 14.5.1 and Iphone Xr. When I use the app and allow it to access my contacts, only 19 contacts show up when I have much more. Can you please help me find a solution?
Just tested the app again at your request. I had to download it again and provide access to my contacts. All 702 of them show up along with Creation Date. To pick ‘Creation Date’ you have to tap on ‘Name’ in the top right corner of the screen.
Tip: Open the Settings app and browse for Contacts -> Accounts. Make sure that you have all Accounts added to have the contacts synced with your iPhone. Let me know if it works!
All my contacts aren’t coming up as well, I’ve also did the tip above and checked that all accounts are allowed to sync.
Not sure what else to suggest. I checked again and it works flawless on my device.
Quite the majority of. My contacts under one date. App sucks.
Have you imported your contacts from an Android device, at some point?
My contacts are all scrambled. My boyfriend was created two years ago, but someone I haven’t talked to in years was created 2 months ago.
That’s strange. Perhaps you imported them when you changed devices and the app takes creation data as when they’ve been added to your device.