Recognize And Block Apple ID Phishing Text Messages
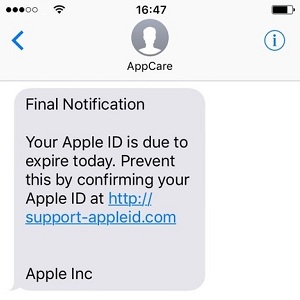
Apple ID phishing attempt via text message.
Your Apple ID is also used to link all your Apple smart devices and allow you to Handoff between smartphone and tablet. This is why it’s considered a valuable piece of information for spammers and a huge target for phishing attempts. Nearby, you can check out one of the latest malicious text messages that’s been sent to iPhone owners. It’s true that the phishing attempt is easily noticeable for an iOS power user, but a newbie could bite the poisoned apple. That’s why I decided to go public and inform our readers, to prevent you from handing out your Apple ID.
 How To Detect Phishing Messages
First of all, you have to be aware that Apple never sends a text message to inquire about your Apple ID log-in credentials. Secondly, you have to check the URL that the text asks you to access. That’s obviously not the official Apple.com website, but a phantom web page used to retrieve your Apple ID once you type it.
The sender’s phone number is also a great telltale sign. More advanced spammers are able to impersonate misleading names in the sender’s field, like AppCare in the above example. Be aware!
Tip: Enable two-factor authentication to add extra security to your Apple ID!
 Steps To Handle Phishing Attempts
1. The first step is to differentiate a scam attempt from a legit Apple message. Use the tips provided above.
2. Once you’re aware that’s spam, tap the ‘i’ in the top-right corner of the screen to unveil the Details page.
3. Next, hit the phone number or sender name area to open up additional options.
4. Pick the bottom setting that allows you to Block the Caller. This prevents additional spam from landing on your iPhone via the same sender.
Tip: Last but not least, delete the message by swiping left on the conversation thread in question.
Fact: Phishing and spam actions can also attack you under the form of iMessages and even iOS Calendar Invites.