5 Ways To Fix AirDrop Not Working On iPhone

How to fix AirDrop not working on iPhone.
AirDrop uses point-to-point WiFi to send and receive data. A direct wireless link between the two devices is created, without the need of a WiFi network. This means that you can use AirDrop even when iPhone is in Airplane Mode as long as you manually enable WiFi and Bluetooth antennas from the Control Center. However, there are still lots of cases when an AirDrop transfer fails. In this article we provide you with a series of troubleshooting tips to get you out of jail!
How To Fix AirDrop Transfer Failures
 I. Check AirDrop Settings
First, make sure that AirDrop is properly configured on both devices involved in the transfer.
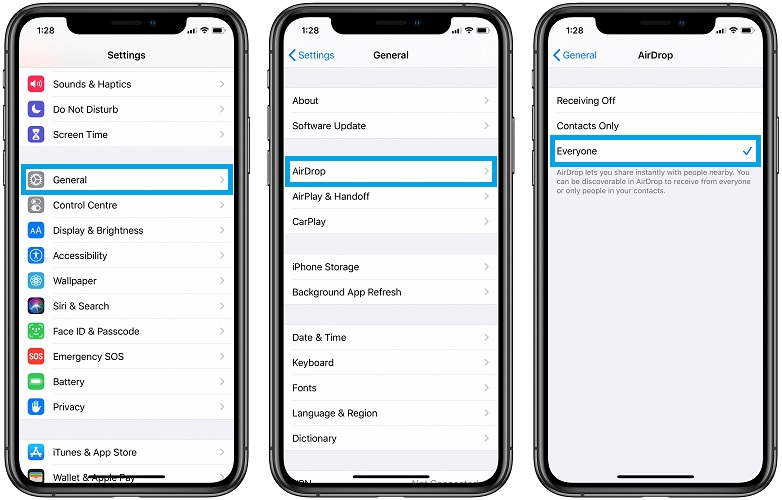
-> On iPhone
1. Open the Settings app.
2. Select General.
3. Tap on AirDrop.
4. Select Everyone to make sure that your device is discoverable for everyone.
 -> On Mac
1. Open the Finder from the quicklaunch bar.
2. Click on AirDrop, available in the sidebar in the Favorites section.
3. Check the “Allow me to be discovered” setting and make sure that its set to Contacts Only or Everyone.
II. Restart devices.
If AirDrop is properly configured but you still can’t transfer files, please restart the two devices. Rebooting an iPhone, iPad and Mac can fix potential AirDrop problems.
How To: You can simply power off the device and turn it back on, or use a force restart command.
III. Mac Firewall
If you attempt to transfer files between an iPhone and a a Mac, the computer’s firewall can prevent a successful AirDrop transfer. Here is how to check if everything is configured properly:
 1. Open System Preferences on your Mac (tap the Apple-icon in the top-left corner of the screen).
2. Click on Security & Privacy.
3. Select the Firewall tab and check if incoming connections are allowed.
Tip: If the Firewall is enabled, click on Firewall options and make sure that the Firewall is set to all incoming connections for built-in and signed software.
Fact: Tap the lock (bottom-left corner) to make changes. Provide your Mac’s Passcode and perform the adjustments needed.
IV. Change Auto-Lock Settings
 In many cases AirDrop transfers fail when you attempt to send large files. This happens because the transfer takes longer and the iPhone enters in sleep mode. The transfer stops and you have to start from scratch. To fix this you can either stay alert and keep your iPhone awake during the entire process, or tweak the Auto-Lock setting before you intend to transfer large files. Here is how to:
1. Open the Settings app.
2. Select Display & Brightness.
3. Tap on Auto-Lock.
4. Opt for 5 minutes or Never.
Fact: You can tweak auto-lock back to 30 seconds as soon as you finish the large file transfers.
V. Check PiHole Configuration
In most cases the above fixes should fix any AirDrop problems. However, in some particular cases AirDrop transfer problems can be caused by network-level advertisement and Internet tracker blocking applications like PiHole. If you have a PiHole installed on your device you have to whitelist the domain ocsp.apple.com. Else, digital certificates for Apple software and content can’t be validated and the AirDrop won’t happen!
Did one of the above fixes work for you? Have you solved your AirDrop problem? Let us know in the comments section available below!
Related: AirDrop with ultra wideband now available on iPhone 11, 11 Pro and 11 Pro Max!
None of these helped. iPhone XR to Mac Mini was working and then it just stopped. Waiting……
Turn Bluetooth off and back On on both devices. This works fro me almost every time.