How To Edit A Live Photo Shoot With Your iPhone Or iPad
Editing the still image of a Live Photo.
Nevertheless, a Live Photo can be also used as a still image. However, not all iPhone owners know that they can edit the still image of a Live Photo to get the best out of it. iOS automatically selects a frame as thumbnail for a Live Photo. It can happen though that you capture something special at the beginning or towards the end of the collage. In this case you can manually edit the still image of your Live Photo and share the best frame with your friends and family.
How To Shoot A Live Photo
Before editing a Live Photo let’s make sure that you capture one using this feature. To make sure that an animated image is captured when you press the shutter button, check the the Live Photo icon is enabled. The “LIVE” toggle found in the top-menu of the viewfinder, between the “Flash” and the “Timer“ options. When the four concentric circles shine bright yellow, it means that the Live Photo option is enabled. The opposite is valid when the icon is white. Simply tap it to toggle the option ON and OFF.
Fact: Be aware that Live Photos require more storage space than the traditional still pictures!
5 Steps To Edit a Live Photo
Here is what you have to do in order to edit the still image of a Live Photo:
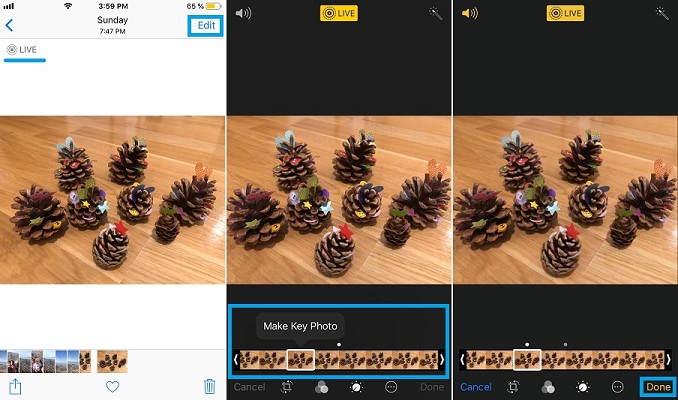 1. Open the Photos app and browse to the Live Photo in question.
2. Tap Edit in the top-right corner of the screen.
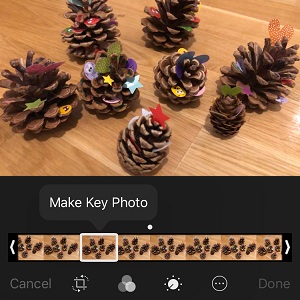
3. The Live Photo edit menu displays a scrubber with all frames of the collage. Use the arrows or tap on the frame that you want to review.
4. Notice the Make Key Photo option appearing on top of the scrubber. Tap it if you find a different frame that you like to set as the frame for the still image.
5. Tap Done, in the bottom-right corner of the screen, to save your changes.
 Tip: Whenever you reconsider, you will find a red “Revert” option available in the bottom-right corner of the Live Photo edit screen, which allows you to return to the original frame, with a single tap… or two because you also want to confirm that you want to remove all edits made to the photo, by selecting “Revert to Original”. Do note, that the revert action can’t be undone!
Fact: After completing the above steps you can share your image on social media or message / mail it to your friends and family using the Share Sheet icon available in the bottom-left corner of the image preview page.