How To Fix The iPhone “Cannot Verify Server Identity” Error
Last updated on June 27th, 2022 at 02:17 am
Posted in Errors and Issues by Tyrone on December 9, 2018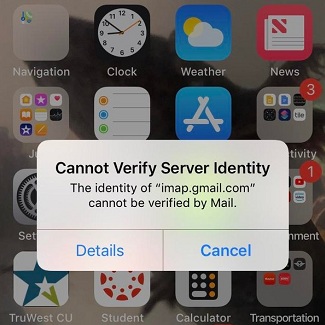
“Cannot Verify Server Identity” error on iPhone.
This iOS error prompt comes with two or three action buttons. You can tap on Details and get access to more info about the server that isn’t validated, or hit Cancel to close the prompt, without solving the issue. In some cases there is also a third choice labeled Continue. Using this last option, allows you to close the prompt and continue using your Mail account. What to do though if the Continue option isn’t available? Read on and learn how to fix this annoying problem!
5 Ways To Fix The “Cannot Verify Server Identity” Error
 1. Restart iPhone
First of all, make sure that there’s no minor glitch that prevents your iOS device from functioning normally.
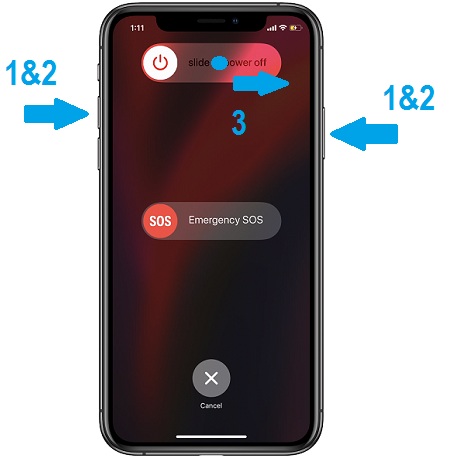
Turn off or hard reboot your iPhone and switch it back on a few moments later.
Next, open the Mail app and test if the problem is solved. If the error persists, proceed to step 2.
Fact: Use the same steps if you encounter the ‘Cannot Verify Server Identity’ error on an iPad!
 2. Delete And Add-Back Mail Account
This fix will reset the identity certificates of your email server. All that you have to do is:
– Open the Settings app and tap on Passwords & Accounts.
-> In the Accounts section, tap on the email account that’s causing the error.
-> Use the Delete Account option to erase it. Confirm your intentions and tap on the red Delete Account label once again.
-> Now, use the Add Account option in the same Passwords & Accounts menu, to add back the mail account that you just deleted. Does this fix the issue on your device?
 3. Disable SSL
In most cases, by this step, the “Cannot Verify Server Identity” problem should be solved. However, if the issues still persists here is what you can do next to troubleshoot:
– Open the Settings app once again and browse for Passwords & Accounts.
-> Tap on the mail app that’s causing problems.
-> Next, tap on the Account that’s registered with the app.
-> Go for the Advanced settings and disable the Use SSL feature.
Update:
 4. Date & Time Fix
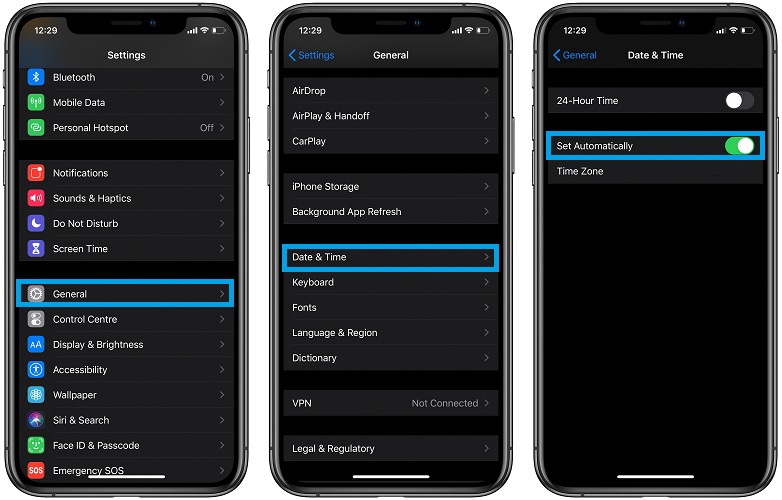
The “Cannot Verify Server Identity” bug can also be caused by a broken Date & Time setting available on your iPhone. Readers reported that allowing your iPhone to automatically set the time fixed this annoying error.
How To:
– Open the Settings app and scroll for General.
-> Tap on Date & Time.
-> Enable the ‘Set Automatically’ option.
Thanks: to ‘Atul’ for sharing this tip in the comments section!
 5. Reset Network Settings
If nothing else works you might have to reset your iPhone network settings. These include customized networks. A reset will restore the default values. So, if the ‘Cannot Verify Server Identity’ error is caused by an incorrect network setting, a reset should finally fix the issue:
– In Settings, select on General.
-> Scroll all the way down for Reset and tap it.
-> Tap Reset Network Settings.
-> Provide your passcode, if prompted.
-> Tap the red ‘Reset Network Settings’ label to confirm that you want to return to the network factory defaults.
 Extra: Disable Fetch New Data Option
If nothing else works, you have one more temporary fix that will at least cause the ‘Cannot Verify Servery Identity’ error to display more rarely.
– In the Settings app, scroll for Mail and tap it.
-> Select Accounts.
-> Tap on Fetch New Data.
-> Disable ‘Push’ or set your iPhone to interrogate the mail server when you manually perform the command.
Does any of the above listed fixes work for you? Use the comments section available below, to share your experience!
Related: You might be also interested in how to fix the “Cannot Get Mail” problem!
#2 has worked so far.
Thanks for sharing.
turn off the wifi
Can you elaborate on this? Turn WiFi OFF and back ON? Else, the advice wouldn’t help too much, because WiFi is a must-have for every iPhone owner.
It does not show an option to delete account (does on my other accounts). Will not let me turn off the SSL either?
Can you please inform us what iOS version are you using? A screenshot of your Password & Accounts page could also help us out to provide additional help. You can use the contact page to mail us more info.
I deleted my account, and am trying to add my account. However, I do not have the option to turn off SSL.
Hi Pam. Did step 2 fix the ‘Cannot verify server identity’ error on your device? If there is no SSL as indicated in step 3. Try fix no. 4. Let me know please what device you’re trying to fix and what OS version you’re running, if none of the above solutions work for your end.
Setting date and time to auto select from net, worked for me.
Thanks for sharing your fix. We will try to replicate it and update it to the article. Did anyone else manage to fix the “Cannot Verify Server Identity” error by configuring Date & Time to ‘Set Automatically’?
I’ve tried everything listed above but there is no change.
Thanks for sharing your experience Richard. You might have to try to Reset Network Settings on your iPhone or iPad. Please refresh this page and check the updated Step 5.
Yes, It was helpful.
Glad that we could help.
Thank you for the clear instructions. I hope it works I followed step 2.
You’re welcome. Thanks for sharing.
Though did not solve my problem, it let me realize why and how to. Big Love
You’re welcome. We’ve just updated the article with a 4th fix. Try it out if you’re still experiencing the problem.
This did not work. Could not switch off ssl.
Thanks for the fix. Please try the 4th fix. Change Date & Time setting on your iPhone.
I have this problem after updating my 5S iPhone today. However I cannot try any of the possible solutions, because the ‘Cannot Verify’ window will not close for more than a few seconds after pressing ‘Cancel’, and everything is hidden.
Tried hard rebooting twice.
Richard does the issue occur both on WiFi and mobile data connections? Can you switch between the two Internet connectivity options and let us know if you can isolate the problem?
I tried all of the options and it’s only slowed and not gone away.
Brian, thanks for your feedback. Can you please let us know what iOS version your device is running?
I have iphone 8 and this started about 3 days ago. I checked date option and all is ok. I also turned phone on/off few times. Not good. I also deleted and added my incoming and outgoing mail accounts. i get mail through Hotmail.
Laurie, thanks for sharing your feedback. Can you please confirm that you are on the current iOS 14.1 software version?
Dont ever tell anyone to disable SSL clearly you dont have security training. Dont listen to that advice.
Richard, thanks for pointing that out. The fix is intended as a temporary solution. The ‘cannot verify server identity error’ is an issue that flared up several times across the years and at some this was away to get rid of the prompt. We will update the article accordingly.
Thanks. The reboot worked for me.
You’re welcome. Glad it helped.
NONE of these solutions have worked so far on my iPhone XR. The error message began popping up on my phone (and my husband’s XR) this morning. The message comes up on repeat as soon as I hit cancel. The only way my phone is usable now is to remove my gmail account. Any additional insights for the iPhone XR?
Try to disable WiFi when this happens and enable it back. Let us know if you managed to find some other working solution.
Thank you. Amazingly #4 worked like a charm.
That’s great. Thanks for confirming.
Great thanks! The reboot worked for me.
Glad we could help!
Don’t underestimate the “Date & Time” fix. After spending several hours searching various options that deal with server issues or network issues trying to get my son’s phone to work. Literally setting “Date & Time” to automatic worked. Annoying but it worked.
Thanks for the feedback. Glad that you managed to fix it!
resetting the time has worked!!!
Thanks for confirming.
I’m getting this error after updating to ios 16.2 for a strange app name that I’m not even using. Can you help?
Thanks for reporting. We’ve posted an article about it here:
https://www.iphonetricks.org/cannot-verify-server-identity-ios-16-error/