How To Scan Documents With Your iPhone And The Notes App
How to scan documents in the Notes app.
Position the document in the viewfinder, tap the shutter button to perform the scan and save your document. You can generate a PDF, by using the Share Sheet icon and selecting the “Create PDF” option, or use one of the available communication channels to send your scan to the desired contact. Many of you might be already familiar with this feature, especially if you scan documents often. However, continue to read and find out a few tips that will make your scanning process quicker and more efficient.
Notes App “Scan Document” Shortcut
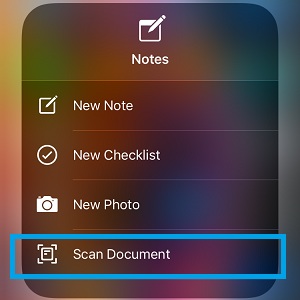
If you own a 3D Touch compatible iPhone you can quickly initiate a scan if you press firmly on the Notes app icon available on the Home Screen. The 3D Touch menu opens up and the Scan Document option is available at the end of the list.
Scan Document From Control Center
 If your iOS device doesn’t support 3D Touch you can use the Control Center to access the scan document feature quicker. To achieve this you have to add first the Notes to the quick action panel by performing these steps:
1. Open the Settings app.
2. Tap the Control Center label.
3. Select Customize Controls.
4. Scroll to the More Controls list and tap the “+” icon available next to the Notes label.
5. Adjust the Notes control to the desired order, for easier access.
How To: With the Notes icon available in the Control Center, swipe for it and long-press the Notes control to unveil the Scan Document shortcut!