How To Send Audio Message With Siri To iOS & Android Contacts (iOS 14)
Send audio message with Siri in iOS 14.
Until now, audio recordings in the stock Messages app have been available only for iMessage contacts, but with this new feature you can also send them to Android users and other non-Apple conversation partners.
All that you need for this feature to work is to run iOS 14 or iPadOS 14 on your iPhone or iPad. At the time of writing iOS 14 is in its test stages. You can install iOS 14 beta on your device or wait until the fall to get the stable public version. Until then just follow us and find out everything that’s new in iOS 14.
How To Send Audio Message With Siri
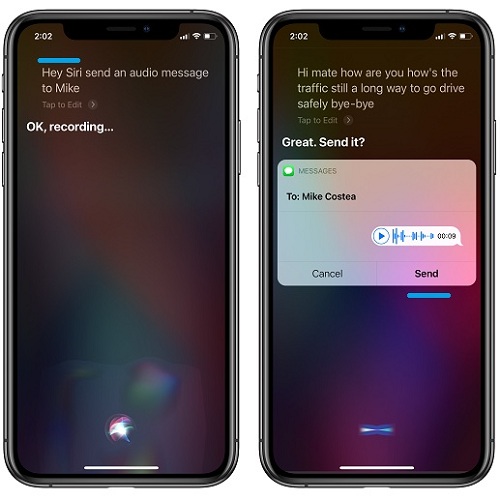 1. Summon Siri on your iPhone or iPad. The easiest way is to use the Hey Siri feature, but you can also long-press the Side Button (or Home Button on older iPhone models).
2. Command: ‘Send an audio message to [contact’s name].’
Fact: If you have contacts with similar names, Siri will clarify the situation and ask you to select the correct recipient from a list.
3. After Siri confirms that its recording (‘OK, recording’) speak out the audio message.
Tip: Siri also transcribes your speech in real time and displays it at the bottom of the screen. This way you can check if its understanding what you say.
4. When you finish the dictation just stop speaking and Siri will stop listening and complete your recording, after a few seconds.
Fact: There doesn’t seem to be a time limit for the length of the audio messages created with Siri.
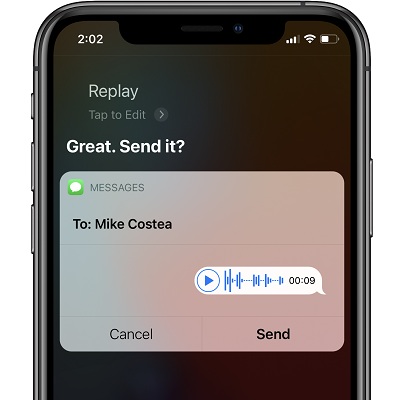
5. After the audio message is compiled, a pop displays it on your iPhone / iPad screen. You have the option to Send, Cancel or play it back to hear if your voice is properly recorded.
Tip: Siri is still active. If you can’t press the screen to review the audio message just command Siri the action that you want to perform.
Change Audio Messages Expiry Setting
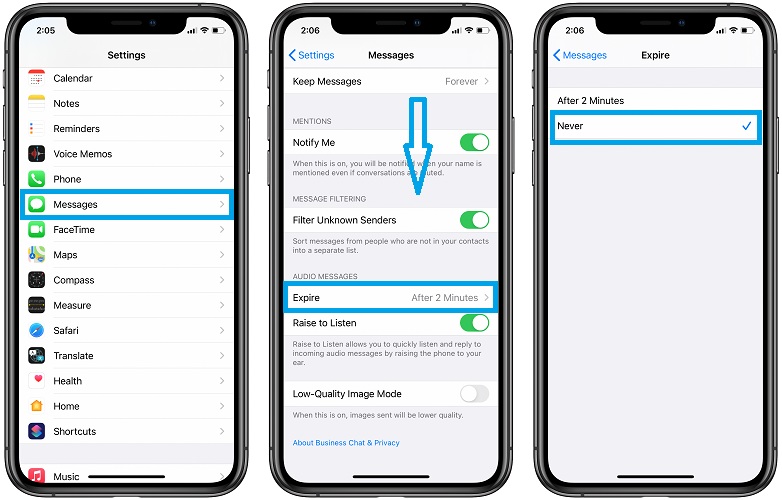 A default iOS option automatically deletes audio messages after 2 minutes. Use the following steps to prevent your recordings from expiring:
1. Open the Settings app.
2. Tap on Messages.
3. Scroll for ‘Expire’.
4. Select ‘Never’.
Fact: You can check if an audio message is still available by opening the Messages app and see if the recording shows up in the conversation thread with the specific contact.
SIri Audio Message Video Tutorial
You can also watch a step-by-step tutorial of everything that has been mentioned above in the following video:
Do you use this iOS 14 audio message feature? Do you fancy the new unobtrusive Siri interface? Let us know by using the comments section available below.
Related: How to teach Siri to use nicknames for your contacts!
You can’t send an audio message from iPhone to Android easily. You can use the Voice Memo app but it’s kinda annoying and long-winded. There are a few apps that do this Talk Droid is one and there is another memo app that does it too but I can’t find it right now.
How do you like talk android? I change from google android to new iPhone. I hate that I do not have the iMessage microphone shortcut for android users who I text. If it weren’t for that I would love this changeover.