iPhone Assistive Touch Review
Last updated on June 19th, 2020 at 06:11 am
Posted in TILs by Patricia on August 20, 2014Assistive Touch is very handy when you are in trouble using your iPhone’s buttons and most helpful when you aren’t able to touch the screen of an iOS device. This means that you can use Assistive Touch to command your iPhone, if one or more of your buttons crash.
Assistive Touch is designed though, to work most efficiently, in conjunction with 3rd party accessories, to aid people with disabilities while using an iPhone, iPad or iPod.
This way disabled people are able to use all features of an iOS device without needing to touch the screen or press device buttons.
How To Enable Assistive Touch
Updated: Starting with iOS 13 the Accessibility feature has its own section on the Settings home screen. It’s not found in the General menu anymore.
1. Open the Settings app and scroll for Accessibility.
2. Tap on Touch.
3. Select AssistiveTouch.
4. Tap on the ON/OFF switch available next to the AssistiveTouch label to enable this feature. Notice a digital home button appearing on your screen. It’s the Assistive Touch menu button. You can drag and place it anywhere on the screen. Optimal position, from our experience, is bottom right corner, if you’re right-handed, bottom left for left-handers.
How It Works
Tap the digital menu button to bring up the feature options. A pop-up with the Main Menu appears on your screen and you have four selections available:
– Siri: tap on the microphone symbol and iPhone’s virtual assistant will jump to your help.
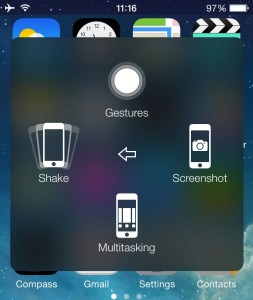
– Device: opens a secondary menu that allows you to: Adjust Device Volume, Mute, Lock Screen, Rotate Screen or open a 3rd level menu branch by tapping More. More Menu branch provides the options to: access Gestures, perform a Screenshot, open Multitasking and Shake device.
– Home: brings up the Home Screen.
– Favorites: provides access to your favorite Gestures. Gestures are pre-recorded swipes and/or taps that can be activated, when needed, with a simple click or tap. They are particularly handy when disabled individuals are not able to swipe or flick to provide a certain iPhone command. Instead they can use the Gestures option commanded via a 3rd party accessory.
Accessories
 People with disabilities can use an iPhone, via Assistive Touch, with the help of 3rd party accessories. This is accomplished with the help of a joystick or a switch. Basically, a Mouse Mover controlled with the help of a joystick is used to navigate and command the iOS device, via the Assistive Touch menu.
Currently there are two recommended by Apple:
– iPortal: offered by Dynamic Controls, provides features like Mouse Mover and Accessibility.
– Connect & Blue2 Switch: accessories provided by Ablenet.
Conclusion
Assistive Touch is a very useful iPhone tool for individuals with disabilities, offering them the opportunity to use an iOS device, relatively easy. It could be a very useful tool for all of us, if our iPhone home button, or any other button is experiencing problems. Their functions can be easily replaced by the Assistive Touch option! Another hidden feature that helps users with physical limitations to operate an iOS device is Switch Control.
Assistive Touch Video Tutorial
Our team has created the following video tutorial about iOS Assistive Touch. Watch it and learn how to turn it ON and see a demo of this highly useful iPhone tool.
What do you think about the iPhone Assistive Touch feature? Would you recommend any improvements? Let us know in the comments section available below!
Related: How to clear iPhone 11 RAM memory with the help of Assistive Touch!


How do you remove a selfmade gesture