How to Use The iPhone Altimeter
Last updated on January 11th, 2017 at 11:01 pm
Posted in Apps or Games by Vlad on August 27, 2014
iPhone Altimeter.
The iPhone doesn’t currently have a built-in Altimeter app, so we have to install one from the App Store before we can start playing with altitude readings.
It’s important to underline from the get-go that all iPhone’s altitude readings serve for recreational and hobby purposes, only. These readings are not professional ones and have a wide accuracy scale. So, by no means, use the iPhone’s Altimeter for flying a plane or perform any other activities that require professional altitude readings!
How Is Altitude Measured?
Edit: With the release of iPhone 6 and 6 Plus, elevation is now calculated with the help of the built-in barometer sensor, that provides air pressure readings. No GPS needed in this case. This leads to battery saving and many other benefits explained here.
Currently the iPhone uses its GPS for altitude calculation. When you activate the Altimeter your GPS connects to satellites orbiting the earth. It needs at least 3 good satellite connections in order to accomplish a triangulation and determine your position by calculating the distance from the iPhone to each satellite. After the GPS coordinates are known, altitude is easily obtained.
How To Install iPhone Altimeter?
Simply unlock your iPhone and tap on ‘App Store’. Next tap on Search, type ‘Altimeter’ and hit the Search button. You’ll find a list of around 300 results. The best and most appreciated apps are listed first. Check the first 3 or 4 available ones, read the description and the reviews and decide which one you wish to install. You can install a couple of them and try them out which one suits you best.
However, we, at iPhoneTricks.org, already did this for you and the Digital Altimeter FREE app by Patrick Giudicelli seems quite reliable. Read on to find out more about it.
 How To Use It
After you installed it, press Open. The Digital Altimeter app starts and you’ll be prompted with the following message: ‘”Altimeter” Would Like to Use Your Current Location’. You have the option to accept or don’t allow. Obviously, you need to press OK to be able to get those readings.
As soon as the Altimeter opens the GPS is also activated and you get your first altitude reading along with Latitude and Longitude information, as well as Horizontal and Vertical Accuracy.
You also have the option to switch measure units from meters to feet and vice versa.
Tip: If you wish to improve accuracy wait for a few minutes until the GPS signal is fully calibrated. You will notice that both Horizontal and Vertical Accuracy improves and that the altitude reading is tuned up accordingly.
iPhone Altimeter Test
Because iPhones currently calculate altitude via the GPS feature, it was interesting to find out if it can detect altitude changes, even if you are in the same GPS coordinates but climb a few stories higher. So, we decided to take two readings. One from the iPhoneTricks.org office, located at the 10th floor and the second one on ground level right below our office. Check the comparison below and see if the iPhone was able to detect the around 30 meter (100 feet) altitude difference provided by our 10-floor building.
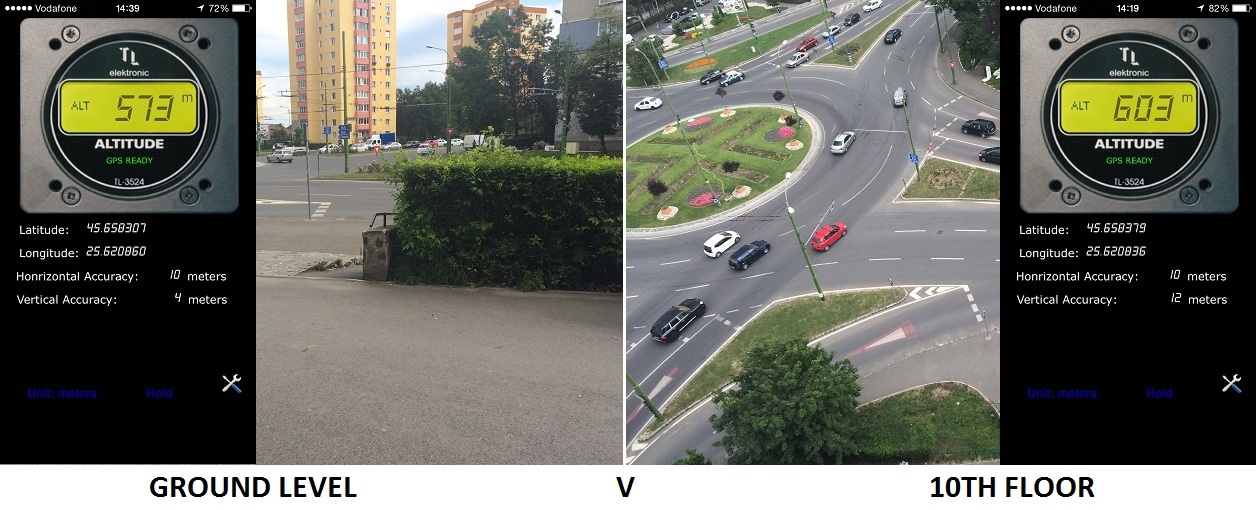
iPhone Altimeter Accuracy Test
Test Result: Success! You’ll be surprised that it actually did. I stood in the the same spot on ground level as well as at the 10th level. I’m speaking of course about the Horizontal axis. The Altimeter did detect the Vertical difference and shows the 30 (100 feet) meter discrepancy between the two readings. So, this proves that the iPhone Altimeter is accurate enough for hobby usage.
iPhone Altimeter Video Tutorial
Here is a tutorial that shows how to install and use the iPhone Digital Altimeter. Video has been recorded using an iPhone 5S running iOS 7.1.2.