Nintype Tap and Slide Keyboard for iOS 8
Last updated on June 25th, 2020 at 08:41 am
Posted in Apps or Games, TILs by Patricia on December 9, 2014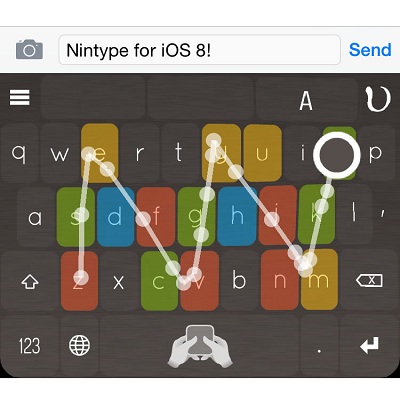
Nintype keyboard for iOS 8!
Nintype combines taping with sliding when writing words on your iPhone’s keyboard. While the built-in iOS keyboard allows only taps and the option to predefine shortcuts, to increase typing speed; Nintype brings word construction to a whole new level, by introducing the slide feature to the clavier.
The major typing boost doesn’t come only from the slide feature, but from the combination of taping, sliding and various gesture shortcuts which build the ultimate typing package for your iPhone. Nintype can help you achieve record breaking typing speeds of over 100 words per minute! The skilled ones can break the 130 wpm barrier. Yes, I’m talking about skills because you need a little experience until you can master this premium iOS keyboard.
How To Enable Nintype For iOS
If my intro has already convinced you to purchase this app and you wish to start as soon as possible, simply download Nintype from the App Store.  Next, wait until it’s installed. Don’t go for the traditional way to open it by taping the icon available on your home screen. Instead, do tap on Settings -> General -> Keyboard -> Keyboards -> Add New Keyboard. Now, select the NinKeyboard – Nintype and you’ve successfully enabled it. Whenever you wish to use it, switch for Nintype, by taping & holding the Emoji keyboard icon, available on the left side side of the spacebar. Select it, and the switch is complete. Repeat the process to return to the native iOS keyboard.
How To Accustom Yourself With Nintype
If you’re still with me, that’s a wise decision, because a few tips could spare you from feeling like throwing $5 bucks out the window. Bear with me a few more seconds, read this review until the end. It will help you approach this new way of typing and become a rapid learner. Don’t imagine that you’ll activate Nintype and be able to write with over 100 words per minute, without following a learning curve. If you start with this attitude, you’ll end up disappointed fast and might quit using Nintype, without even getting a taste of slide-typing.
1. Nintype Tutorial
 When you open this third party iOS keyboard for the first time, you’ll be prompted with a much needed tutorial.
Jormy, the developer of Nintype, has come with a great hands-on crash course.
Go through the entire lecture and train hard.
From my own experience, I suggest you to perform this learning guide at least three times until you manage to accumulate all the precious info provided by the developer.
2. Skill Anticipation
I have no doubt that you’ll manage to efficiently use Nintype. However, begin slow! Start typing as you usually do on the built-in iOS keyboard. Introduce slides gradually whenever you have upcoming letters grouped nearby. The more confidence you gain, the more complicated slide&tap combos you’ll be able to use use. Progress step by step. When slides become more often than taps, you can consider yourself an experienced Nintype user!
3. Shortcuts & Gestures
 If you don’t know the punctuation shortcuts you lose precious time when using Nintype. Memorize them fast and you’ll be already one notch faster than using the native iOS keyboard. This premium board comes with the following built-in gesture shortcuts: Move Cursor (Slide Spacebar left or right!); Question Mark (Slide upwards from the Enter key!); Exclamation Mark (Slide down from the backspace key!); Comma (Slide down from the ‘V’ letter!); Quotation Mark (Swipe left from the enter key!); Period Key (Slide down from the ‘N’ letter!); Backspace (Slide left from backspace key to delete the desired amount of characters!); Hash Tag (Swipe left and back to origin from Enter key!); Slash (Slide down from backspace and then left from Enter key!)
4. Peckmode To The Rescue
 If you’re not mastering this tool completely, you can always switch for Peckmode whenever you’re in a hurry or using the keyboard with apps that are not fully compatible with the slide&tap concept. Peckmode transforms Nintype in a conventional keyboard. For example, I noticed that it can be a pain in the butt when adding a new iOS Contact. If you release a slide without ending the name or perform a letter tap, iOS will automatically jump to the next field. This creates a mess, which can be avoided if you enable Peckmode when needed. Be aware that Peckmode disables sliding, but you still have all the above shortcuts available! Switching for this simplified mode is done by taping and holding the globe icon, left to the spacebar.
5. Language & Dictionaries
 If you’re not writing in English language it’s mandatory to activate additional dictionaries. Nintype can also learn new words, but you have to tap them manually and press space bar to register them. Only a recognized word can be slide-typed. Dictionaries can be added from the options menu. Main menu is activated by taping & holding the space bar an then sliding up. Navigate to Options and scroll for Language & Dictionary. Tap the desired dictionary and then hit Apply. You can have multiple languages loaded in the same time and allow the keyboard to automatically switch between.
6. Enable WPM Display
 Recognizing progress is always the best possible motivation. This is why I recommend you to activate the words per minute display, which shows your current speed of typing. The info is updated on the spacebar.
Enable it by taping, holding and sliding up the spacebar. Don’t release your hold and slide towards the top of the pop-up menu, until you reach the speedometer icon. Repeat the process if you wish to deactivate it.
You can find many other visual and typing settings available in the Options menu. I recommend you to tweak them later on. Focus on your learning path for now.
7. Battery Saving ZenMode
 After you master Nintype you might become addicted to typing. One of the small downsides of this third party keyboard is that it burns a little more juice from your battery. However, you can switch for the battery saving Zenmode. According to the developer it can save up to 75% of battery life, compared to normal mode usage. The disadvantage is that you have to do without slide pattern animation and the rich graphic display that makes your keyboard look science fiction-like.
Zenmode is activated from the spacebar too. Perform the now famous tap, hold and slide up gesture to reveal menu and slide your finger until it hover the battery saving mode icon.