How To Change The DNS Setting On Your iPhone’s And iPad’s Wi-Fi Connectivity
iOS 11 Configure DNS Setting.
Most Wi-Fi networks automatically assign the Domain Name System (DNS) according to the router’s configuration. However, there might arise situations when you have to manually edit the DNS in order to implement restrictions like parental control or debug patchy Wi-Fi performance. Continue to read to find out how to tweak the DNS of your iPhone’s Wi-Fi connection and find out the most common used free DNS services.
How To Change DNS On iPhone and iPad
 1. Open the Settings app from the iOS Home Screen.
2. Enter the Wi-Fi menu and make sure that the feature is enabled.
3. Tap the blue “i” available next to the connected Wi-Fi network.
– iOS 10 and earlier
4. Tap on the DNS label to enter edit mode. -> Input the new DNS. -> Tap on Wi-Fi in the top-left corner of the screen to save the changes.
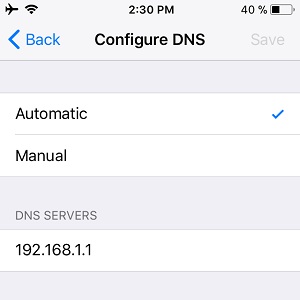
-iOS 11 and newer
4. Tap on Configure DNS. -> Select “Manual” -> Tap on Add Server. -> Hit Save in the top-right corner to save changes.
Free DNS Servers For iPhone and iPAd
Google and OpenDNS are the most popular DNS services used by iOS users that opt to manually configure this Wi-Fi setting. You can use them too free of charge:
Google DNS: 8.8.8.8, 8.8.4.4
Open DNS: 208.67.222.222, 208.67.220.220
Fact:: Configure them as described in the tutorial provided above!
 Tip: After you change the DNS configuration make sure that you restart the Wi-Fi connection to allow changes to take effect. Restarting is done with the help of the Airplane Mode. Swipe up for the Control Center and enable the Airplane Mode. This will turn off all iPhone antennas. Wait for a few seconds and disable Airplane Mode to bring your iOS device back to life. Open Safari and check if the web pages load properly!
DNS Setting And Parental Control
If you want to prevent children from accessing inappropriate content via Safari, one option is to use the free DNS service provided by OpenDNS and known as FamilyShield (208.67.222.123, 208.67.220.123).
Else, you can use the built-in iOS Restrictions feature, which allows you to Passcode protect explicit content, enhance Privacy, block ads, limit purchases or volume intensity.
I’m using this guide to access a game’s private server. I followed the airplane mode trick and also turned off Wifi connection, and then restarted the game, but it still won’t leave the normal server. How can I access a game’s private server?
I do as is instructed but every time after I save it it goes back to automatic, how can I fix this?
mine is iPhone5s but it doesn’t have any dns configuration settings like others . mine at the end of wifi setting page is HTTP PROXY settings why?