How To Fix Intercom Could Not Be Delivered To HomePod Error

Intercom Could Not Be Delivered error
Are you trying to broadcast a voice message to your HomePod but the Intercom could not be delivered error is displayed in the Home app on iPhone or iPad? This usually happens if a glitch is occurring on your iOS device, or if the HomePod is offline, disconnected from the Internet.
Intercom Works Over Cellular Data
The original HomePod as well as the HomePod mini can be used as an Intercom. This means that you can send and receive voice messages, in the Home app, even when you are away from your home and not in range of your Wi-Fi hotspot.
Yes, the HomePod Intercom feature is designed to work over cellular data. However, in some cases the iPhone might experience issues and the Intercom could not be delivered error is displayed when the iOS device is using mobile data!
How To Fix Intercom Not Working On HomePod
Try out these troubleshooting steps to solve Intercom messages not sending:
1. Check Internet Connection

First of all make sure that the iPhone / iPad that you are trying to send an Intercom recording from is connected to the Internet. Either, Wi-Fi or Cellular Data should be OK.
When neither a Mobile Data or Wi-Fi network connectivity is available, the ‘Unavailable. Can’t connect to any HomePods’ error message is displayed in the Intercom interface of the Home app.
2. Reboot iPhone
A minor glitch could prevent the Home app on iOS from reaching the HomePod. I recommend you to force restart the iPhone to flush out potential minor issues.
How to: Click and release Volume Up, followed by Volume Down -> press & hold the Side Button until the screen turns black and the Apple logo is displayed. Be patient until the device reboots.
3. HomePod App Permissions
The Home app should be able to access Cellular data and iCloud for the HomePod Intercom feature to work. Make sure that these two settings are enabled:
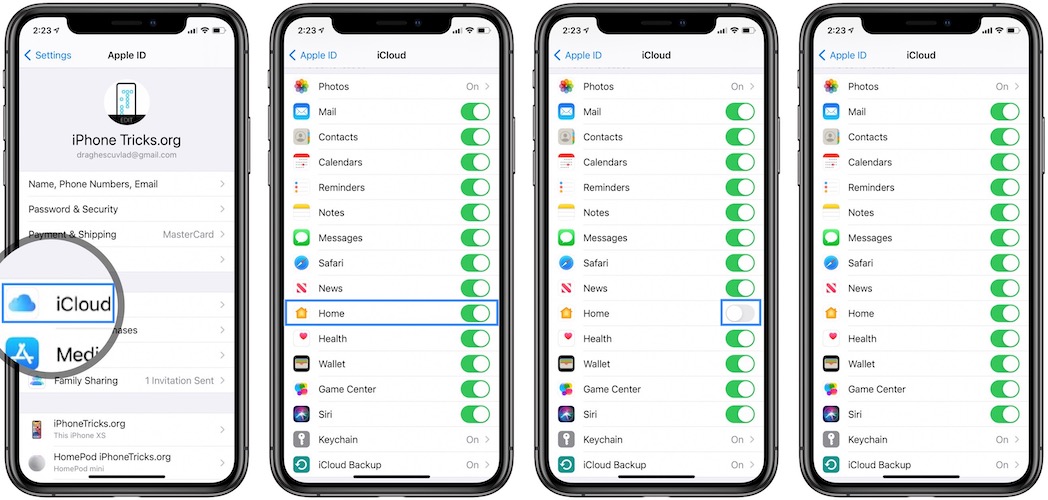
- A. Settings -> Cellular -> Search for Home in Cellular Data list and make sure that the permission to use mobile data is enabled!
Tip: If Home is already ON, switch it OFF and then switch it back ON to trigger a refresh of this setting. - B. Settings -> Apple ID -> iCloud -> Home should be turned On in the Apps Using iCloud list.

4. HomePod Settings
Check the Home settings to make sure that you’re allowed to send Intercom messages:
- Open the Home app and browse the Home tab.
- Tap on the house icon, available in the top-left corner of the screen.
- Select Home Settings.
- Tap on Intercom.
- Make sure that you are allowed to send and receive intercom communications.
Tip: If you already have the permission use the knob to restrict yourself. Force close the Home app. Re-open it and browse to the same settings. Enable yourself back. This trick could force some settings to refresh and fix the Intercom not working problem.
5. Receive Notifications Anywhere
There is one more important setting in the Home app called Receive Notifications When. By default the setting is set to Never. The other two options are: While At Home and Anywhere.
Fix: To prevent the Intercom could not be delivered error from showing up you have to choose Anywhere.
Only Never Available
Is the Receive Notifications When option stuck on Never? No other option is available? That’s because Location Services for Home must be disabled.
Fix: Open Settings and browse for Privacy -> Location Services. Enable Home to access your location While Using the app.
Did you manage to fix Intercom not working on HomePod? Has one of the above troubleshooting tips helped you out? Do you have a better solution? Use the comments section and share your feedback.
Related: HomePod unresponsive? Here is what you can do about it!
Hi Vlad,
thank you so much for posting this fix. For almost 6 months i was not able to fix this.
The simple trick to toggle “ON” – “OFF” – “ON” helped me.
You should share this on YouTube… because no one shared this issue/bugfix.
Thanks again.
Regards,
José
Thanks for confirming the fix Jose. And also for the recommendation. Will consider the video for sure. Glad I could help!