How To Set Up iCloud Custom Email Aliases For Mail App
Custom Email Alias Setup
Starting with iOS 15, iPadOS 15 and macOS 12 Mail users are able to set up iCloud custom email aliases. You only need a domain name that you already own. Configure it for sending and receiving messages in the stock Mail app on an iPhone, iPad or Mac.
How To Set Up Custom Email Aliases For iCloud Mail
1. Add Custom Email Domain
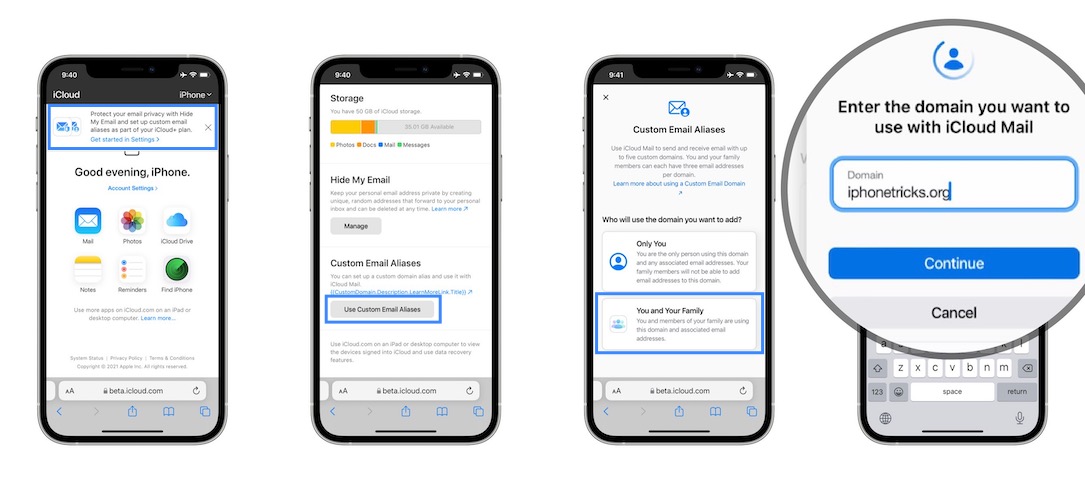
- Open Safari and browse to beta.icloud.com (‘beta’ because iOS 15 is currently in its beta testing stages. Once the new OS will go live to the general public, just use icloud.com)
- Go for the iCloud Account Settings.
- Tap on Use Custom Email Aliases.
- Go for Add a domain you own.
- Select the permissions for the new domain alias. There are two options: Only You, You and Your Family.
- Type the domain name that you want to use and alias with iCloud Mail. Hit Continue.
Tip: You have to own the domain name. It has to be active and you need access to the registrar that’s been assigned with. If you don’t own the domain you can register it within minutes (if available), using popular domain registrars like Namecheap, Hostgator etc.
2. Add Existing Email Address
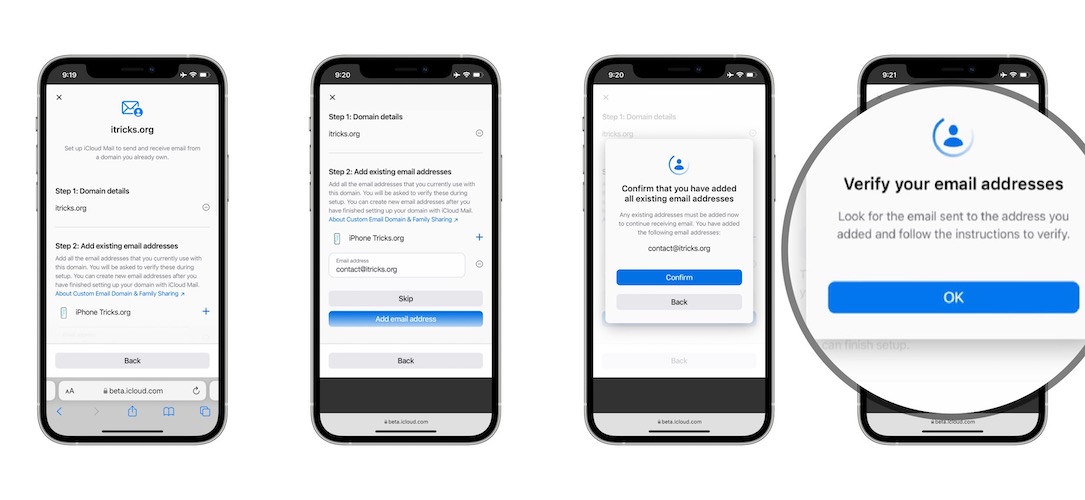
Next, you have to type an existing email address. Be aware, that you need to be able to access the email address that you’re adding to verify it. Apple will send a verification email.
Fact: If you just registered the domain, you need to create an email address from the cPanel interface, or any other similar software that’s provided by the domain registrar.
Tap Confirm. A test email will be send to the address that you plan to use as an alias. You can access it in the webmail section of the cPanel.
Tip: You will be able to create other email addresses after you finish setting up the domain name!
3. Update Domain Settings With Registrar
After you’ve verified the email address that you want to use as an alias, it’s time to update your domain registrar’s settings, including MX, TXT and CNAME records.
To accomplish this step you need to log-in with your domain registrar and browse to the DNS Zone editor section. For example, in cPanel you can search for the domain name and use the Modify The Zones option. In other cases you can find it in Mail Settings or DNS Management.
First, filter the existing MX records and delete them.

Next, use the Add Record option to add the following zones:
Important: Replace ‘[example.com]‘ with your domain name!
MX:

host: [example.com].

points to: mx01.mail.icloud.com.

priority: 10

TTL: 3600
host: [example.com].

points to: mx02.mail.icloud.com.

priority: 10

TTL: 3600
TXT:

host: [example.com].

points to: "v=spf1 redirect=icloud.com"

TTL: 3600
CNAME:

host: sig1._domainkey

points to: sig1.dkim.[example.com].at.icloudmailadmin.com.

TTL: 3600
Tip: For more details check Apple’s support document for setting up an existing domain with iCloud email!
4. Finish Setting Up The Domain
Return to your icloud.com account and verify the new settings by tapping Finish set up.
How To Use Custom Email Aliases In Mail
You can currently use iCloud Mail to send and receive email with up to 5 custom domains.
If you opt for Family Sharing, each member can have 3 email addresses per domain.
- Open the stock Mail app on your iPhone, iPad or Mac.
- Tap on compose new email, available in the bottom-right corner of the screen.
- Long-press the From: field and select from the available iCloud custom domain aliases.
Have you managed to set a custom domain name to use as iCloud Mail alias? Do you encounter any problems with this feature? Use the comments section if you need more help.
Related: Learn how to use the new iOS 15, iPadOS 15 and macOS Monterey Hide My Email feature! It allows you to keep your main email accounts private, by generating unique, random addresses that forward to a predefined address.
You might be also interested in the new Private Relay feature to hide your IP address and prevent trackers from profiling your web browsing activity.