How To Slow Down Time-Lapse Videos Recorded With Your iPhone Or iPad
How to edit time-lapse speed on iPhone.
Unfortunately, although this feature is standard in iOS for almost 6 years, we still don’t have the option to adjust the compression rate. The iPhone Camera is only able to record the default 15x time-lapse. There is no stock option to slow down or speed-up the video in the Settings or Photos app. Thankfully we have third-party apps that can do the job. Most video editing apps available nowadays will allow you to slow down or speed up a recording saved on your iPhone. In this article we’ll check out how to perform this edit with Apple’s iMovie app.
How To Slow Down A Video With iMovie
Before we start please make sure that you have the latest version of iMovie installed on your iPhone or iPad. Direct App Store link available here.
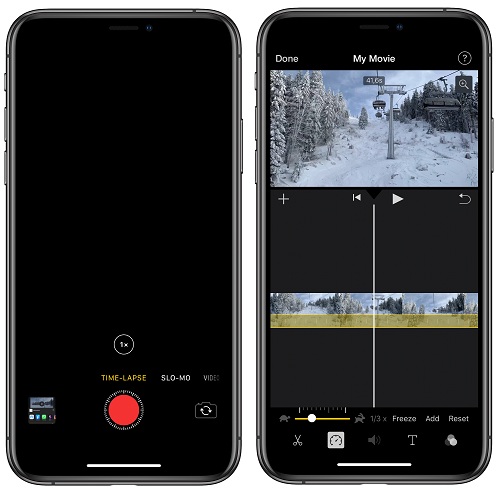
 1. Open iMovie and select the type of video that you want to create. (Movie or trailer)
2. Next, pick the media that you want to include in your project. The time-lapse video that you plan to edit should be among them.
3. Tap on the video that you want to slow down.
Tip: If you don’t need the entire clip, or you want to slow down just a portion of the movie use the Cut function (Scissors icon), available in the bottom-menu options, to split the video.
4. Tap on the Speedometer icon, available in the tools-menu, at the bottom of the screen.
5. Adjust the speed of the video by dragging the speed-bar pointer towards the turtle. Notice how the length of your video is increasing.
Fact: Unfortunately the video will become choppy if you slow it down significantly, simply because there aren’t enough frames recorded to keep it fluent. That’s why a native setting to adjust time-lapse speed, before recording would be highly recommended.
6. Tap Done and use the Share button (bottom menu) to Save the edited move to the Photos app. Check the step-by-step screenshot tutorial uploaded nearby, for more details!
Tip: One other option would be to record time-lapse videos on your iPhone with the help of third-party apps like Hyperlapse. This Instagram-owned app is free to download and offers you the option to record time-lapses with a compression range of 2x – 12x. You’re able to preview your time-lapse and test the various compression options. Tap the OK only after you select the desired compression speed. More details are available here!
Are you a fan of Time-Lapse videos? Do you use third-party apps or the built-in iOS feature to record them? Let us know in the comment section available below!
Related: Did you know that iPhone 11 models and newer can record slow-motion selfies (slofies)?
This doesn’t work.
Hi Ryan. Can you please be more specific. At what step of the tutorial are you encountering problems?