Change Picture Greyed Out On Mac in macOS Monterey? (Fix!)
Change picture greyed out on Mac
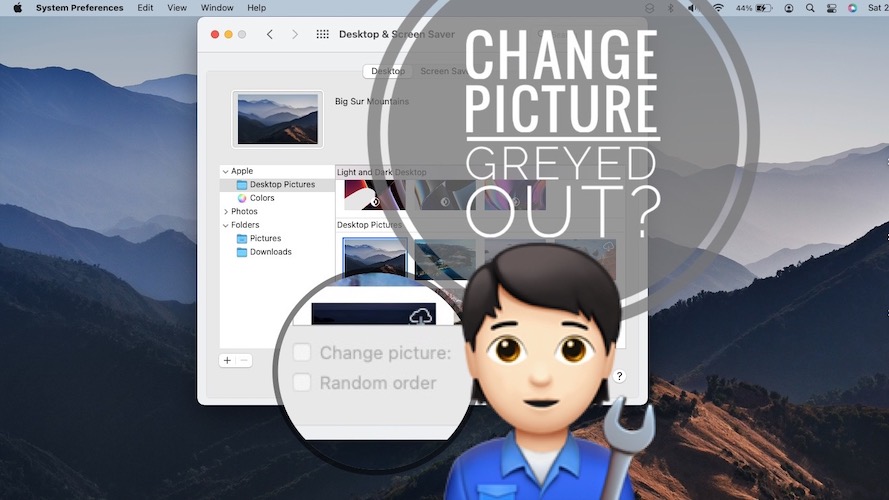
Is the Change Picture option greyed out on Mac after updating to macOS Monterey? You’re not able to set desktop pictures to shuffle at a predefined time interval? This is a widespread macOS 12.0.1 bug!
Change Picture Greyed Out In macOS Monterey
This issue has been initially reported by Louise:
“It will only let me tick ‘Change picture every 30 minutes’ if I use Colours. What am I doing wrong? With Desktop Pictures the box is not clickable.”
confirmed by Sheila M.:
“I have the same issue. It does not let you select to change the desktop picture at any interval.”
and Chris B.:
“I am also having the same problem the check box to allow background images to change is greyed out.”
We’re also encountering the same issue when trying to set Desktop Pictures to shuffle in macOS Monterey.
How To Fix Desktop Pictures Shuffle Not Available
This appears to be yet another macOS Monterey bug. Here is what you can try to troubleshoot until Apple issues an official fix within the next software update:
1. Download All Backgrounds

Go for System Preferences -> Desktop & Screen Saver and select Desktop Pictures in the left sidebar.
Scroll for the Desktop Pictures section and download background images that are not available yet, by clicking on the cloud icon, available in the top-right corner of their thumbnail.
Fact: The more desktop backgrounds downloaded the higher the chance of enabling the Change picture checkbox.
2. Force Restart Mac
If the above tip doesn’t work, you can try to hard reboot your computer:
Simultaneously press & hold the cmd (command) + ctrl (Control) keys along with the Power button until the screen goes blank and your Mac restarts!
3. Change Photos Folder
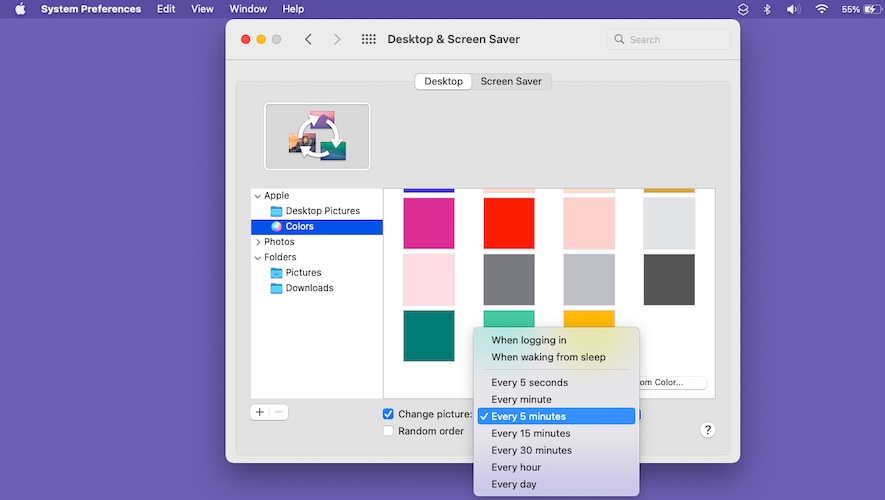
The wallpaper shuffle option is working for user created folders. Change picture isn’t greyed out for Colors folder either.
Until Apple fixes this bug, you can select another photo folder available and set those backgrounds to shuffle!
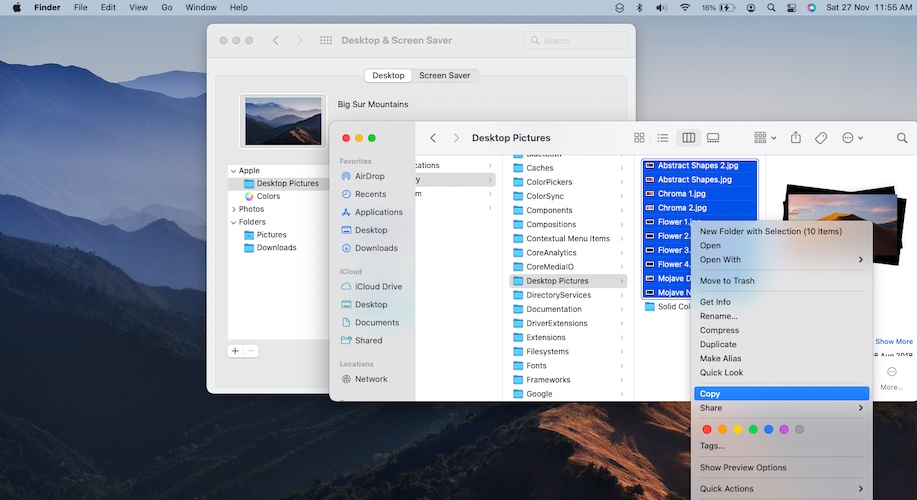
4. Duplicate Desktop Pictures Folder
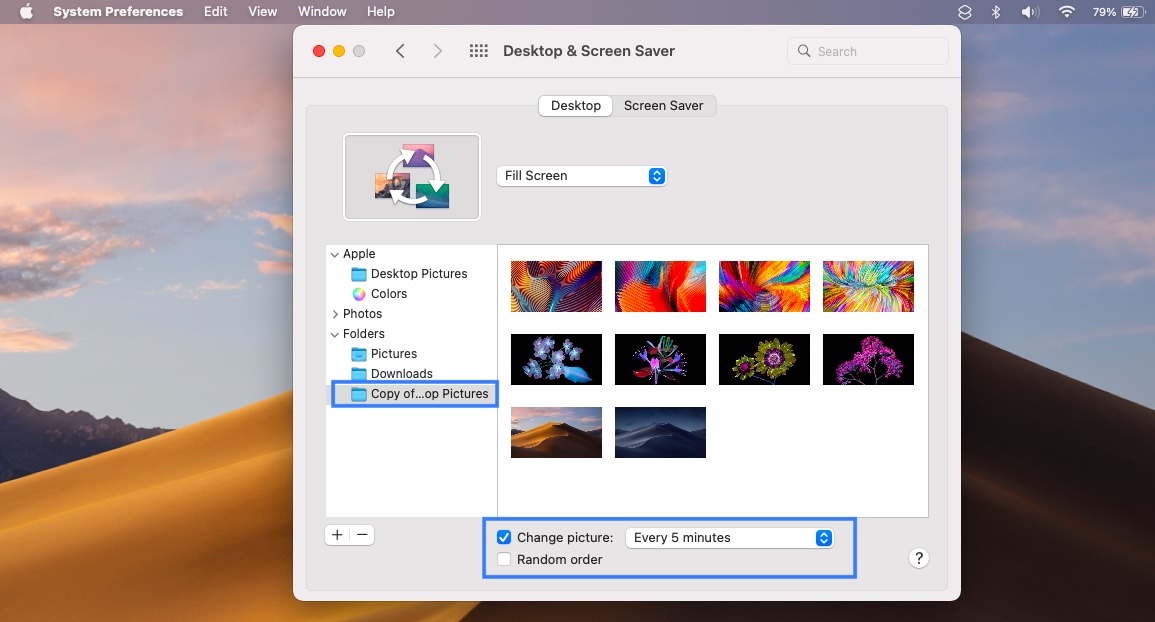
This is the best workaround that you can perform to bypass the Change picture greyed out bug. It requires you to create a copy of the Desktop Pictures folder and select it in the other folders section:
- 1. Open Finder and click on Go available in the top menu bar.
- 2. Select Go to Folder and type
/Library/Desktop Pictures. - 3. Copy all .jpg files from the Desktop Pictures folder.
- 4. Click on Downloads, available in the left sidebar of the Finder window.
- 5. Right-click on an empty area and select New Folder.
- 6. Name it ‘Copy of Desktop Pictures’ and paste all the backgrounds that you’ve previously copied.
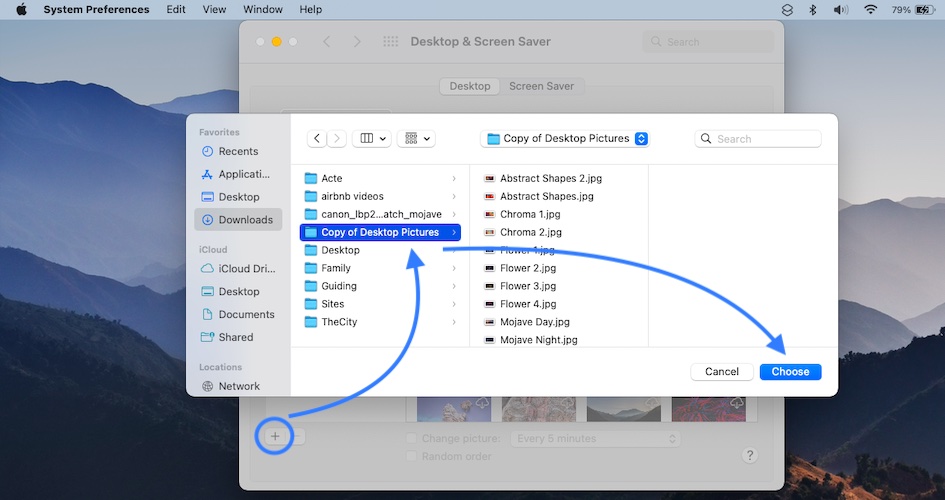
- 7. Go back to System Preferences -> Desktop & Screen Saver and select Folder in the left sidebar.
- 8. Click the ‘+’ icon and add the folder that you’ve recently created.
- 9. Select the ‘Copy of Desktop Pictures’ folder and the ‘Change picture’ option shouldn’t be greyed out anymore.
- 10. Select the desired timeframe and you’re ready to go! Does it work?


Have you managed to fix the shuffle Desktop Background not working on Mac? Do you have a better solution? Use the comments section and share it with us!
Related: Check out other common macOS Monterey glitches:
– Screensaver black screen bug
– Photos slideshow not working
– Mouse cursor gets stuck frequently.
#3 was a great fix! And now I have many more photos to change to!
My bad….#4 (creating a copy of the Desktop Photos folder and adding it into Desktop preferences) was successful! Thanks!
Thanks for confirming. Glad it worked!
New OS 12.2 has NOT fixe this issue, how can this have been overlooked. Woeful.
Mac Monterey
Before I answer, the question regards Right-Click on Desktop > Apple > Desktop Pictures. Unable to select Change picture / Random order. It will work on Colors.
ALL of the island/rock/land/sea and other desktop images are now buried in XML Code.
As far as I know, there is only one way to get the PREFERRED images to change automatically. Here is the workaround.
The objective of the following steps is to minimize and eliminate EVERYTHING on the desktop, except for the single folder you create.
Move any folders & files on the desktop to your HD/SSD/External Drive. Create a single MT desktop folder and name with a single character. Go to FINDER PREFERENCES > General > DESELECT any of the Check Marked 1st four items.
Preferences > Dock & Menu Bar > Slide Dock Size to small. Next, Menu Bar > Check both Options.
Right-Click Desktop and IF HIDE VIEW OPTIONS is visible,, CLICK IT TO ENABLE: Show View Options. Change Icon Size to 16 X 16. Grid spacing MINIMAL; Text size 10; Label Position BOTTOM; UNCHECK Show Item Info & Show Icon Preview. The Desktop should have a single TINY Folder. Hide it in a corner or wherever you’d like to. You are now prepared for Phase:
2. Using Desktop & Screen Saver > Apple > Desktop Pictures. Choose the ones you want. Start by choosing a single image and letting it display – full size – on your desktop. Click Shift > Command > 4 to activate the screen capture tool. Select the maximum image area that contains NOTHING unrelated on the desktop. Pick a point in Far-Left Top Corner, avoiding any toolbar image near top that is visible. Scroll to Far-Right Bottom Corner and stop before the dock and your tiny file folder. Click to select and the screen image is now on your desktop. Name it, and move it to the TINY folder. Repeat for each chosen image. Once you’ve captured the desired images, go back to Desktop & Screen Saver. Under Albums, create a subdirectory named Desktop System Photos (or whatever) and move the photos from your tiny desktop folder to the DSP folder.
Select that directory and CHECK Change Picture then select time between photos. Of course, Random order is another choice.
I’ve done the best that I could to describe my working solution. Feel free to comment on simpler, or to inform me it isn’t working.
It happens when the battery charge is below 50%.
Thanks for sharing this. You think it’s intentional behavior? Doesn’t make too much sense though.