How To Download All Your Facebook Photos And Videos To Your Computer Or Google Photos

How to copy your Facebook photos and videos.
Downloading to a computer is done with the help of a download link generated by Facebook, while the transfer to Google Photos requires you to log-in with Google and provide permissions to the photos storage sharing. Facebook has recently released this photo transfer tool and is now available worldwide. The media is saved to your computer under the form of a .zip archive. More details are available below.
 Facebook Photo Transfer Tutorial
1. You have to open Facebook and log-in via a web browser.
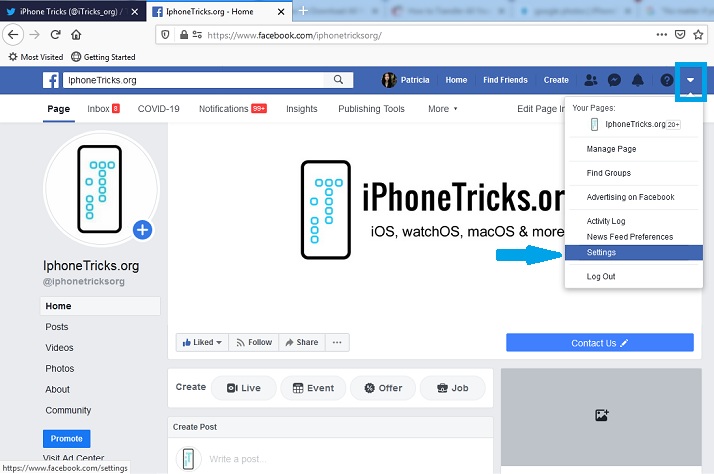
2. Click the ‘down-arrow’, available at the end of the footer menu, right next to the ‘Quick Help’ icon.
3. Choose ‘Settings’ from the drop-down list.
4. Click ‘Your Facebook Information’ in the left sidebar.
5. Select ‘Transfer a copy of your photos or videos’.
6. Provide your Facebook account password to confirm that you’re the account holder.
 7. Click ‘Download Your Information’ to generate a download link and grab the photos and videos that you posted on your computer. To transfer to Google Photos account skip to Step 9.
8. Select Date Range, Format and Media Quality. Also mention what data you want to export. Photos and Videos are selected by default, but you can also include Stories, Marketplace and much more.
9. Click ‘Create File’ and a download link will be generated. You will receive a notification when ready. Click it to download the content under the form of a .zip archive.
 10. Else, click on ‘Choose Destination’ and select Google Photos.
11. Select what you want to transfer, either all your Photos or all your Videos and click ‘Next’.
12. Log-in to the desired Google account and grant Facebook permission to add to your Google Photos library, by clicking on Allow.
13. Click ‘Confirm Transfer’. The status will show pending and you will receive an email from Facebook when the transfer is completed.
Do you plan to use this new Facebook media export feature? Let us know in the comments section available below.
Related: Do you know that Google Photos provides free unlimited cloud storage for iOS?