How To Turn On iPhone Private Wi-Fi Address In iOS 14

Privacy Warning for Private Wi-Fi Address turned off.
When enabled it allows your iPhone, iPad and Apple Watch to use a different MAC address for every Wi-Fi network that it connects to.
This prevents your Apple gadget from being predictable, thus trackable by potential network observers and operators.
A Privacy Warning is issued in the Wi-Fi Settings app.
It’s visible when the Private Wi-Fi Address feature is turned off, for the network that your Apple device is currently connected to.
You can easily enable Private Address to increase your privacy and reduce tracking.
What Is A Private Wi-Fi Address?
To interact with a Wi-Fi network, any device must use an unique network address to identify itself. This address is also know as MAC, as media access control address.
When a device uses the same MAC across multiple networks, it becomes easier identifiable thus traceable.
To diminish this privacy risk iOS 14, iPadOS 14 and watchOS 7 are able to use different MAC addresses for each Wi-Fi network that your Apple device connects to.
These unique static MAC Address becomes your device’s private Wi-Fi address for that specific network.
Turn On Private Wi-Fi Address On iPhone & iPad
 1. Open the Settings app on your iOS 14 or iPadOS 14 device.
2. Select Wi-Fi and check the network that you’re currently connected to. Is the ‘Privacy Warning’ displayed below the [network name]?
3. Tap on the blue ‘i’ (info) icon, available next to the [Wi-Fi network name].
4. Use the toggle next to the Private Address label to enable the feature.
5. Tap on ‘Disconnect’ to confirm that you’re OK with a temporarily disconnection from the specific Wi-Fi network. Your iOS device needs to briefly cut the ties to change its MAC address before reconnecting.
Fact: Notice how the iPhone / iPad displays a new Wi-Fi Address after the re-connection. An IPV4 Address is also available at the bottom of the screen.
Turn On Private Wi-Fi Address For Apple Watch
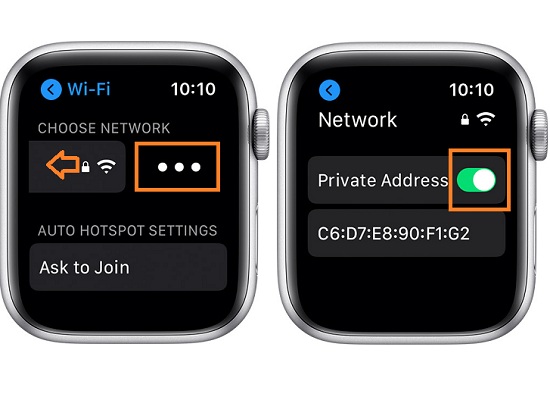
1. Open the Settings app on your watchOS device.
2. Tap the name of the connected network.
Tip: If you haven’t connected to a network yet, swipe-let on its name and tap the more (the 3-horizontal dots).
3. Tap on Private Address, to enable the feature.
Fact: The Apple Watch will briefly disconnect from the current Wi-Fi network, change its MAC address and reconnect.
Private Wi-Fi Address Troubleshooting
Enabling the private Wi-Fi address feature shouldn’t affect the connectivity with most Wi-Fi networks. Your iPhone, iPad and Apple Watch should connect normally as before enabling this privacy feature.
– In some rare cases a wireless network could allow you to join with a private address but won’t provide internet access. In this case disable the private address feature for that specific network only.
– Other Wi-Fi networks might not be able to use a private address and provide parental controls, or authorize your device to join. In this case you can turn off the private address feature.
– When a Wi-Fi router is set up to notify you whenever a new device joins the network, you will get pinged after you turn on the private address feature and join the network for the first time with a different MAC.
Did you encounter any problems while using private Wi-Fi addresses on iPhone, iPad or Apple Watch? Let us know in the comments section available below.
Related: At the beginning of this article I mentioned about the many privacy enhancements available in iOS i4. Here are a few of them:
– receive iPhone notifications when an app pasted from Clipboard,
– forces apps to ask for local network connectivity permission,
– allows you to provide third party access only to Select Photos,
– hide your exact location and much more.
Thanks! This was helpful.
You’re welcome. Glad we could help.