Fix macOS Big Sur Not Enough Free Space To Upgrade Issue
Last updated on October 25th, 2021 at 01:15 pm
Posted in How To by Tyrone on November 13, 2020
How to fix macOS Big Sur not enough storage to update!
Upgrading to macOS Big Sur can prove to be quite a challenge especially if you’re trying to do it now as soon as it was released.
If you manage to get past the ‘An error occurred while installing the selected updates‘ popup and actually download the macOS 11 update package, there is a high probability that you’ll get stuck at the ‘There is not enough free space on the selected volume to upgrade the OS!’ error dialog box!
macOS Big Sur Storage Requirements
Believe it or not macOS Big Sur requires an astonishing 46,01 GB of storage space on your Mac. That’s around 12.18 GB for the update file and an additional 34,83 GB to be able to deploy and perform the macOS 11.0.1 installation. That’s a huge amount of space especially for Mac owners that are limited to 128 GB!
As you can see, in the screenshot updated nearby, our Macbook Air already has the 12,18 GB large macOS Big Sur update file downloaded and there are 7,4 GB extra available. But the macOS Big Sur install screen claims that I need to free up an additional 27,43 GB!
How To Check For Available Storage Space On Mac
To be efficient when trying to create additional free space you need to know what files are the biggest storage consumers on your Mac.

- Click the Apple logo, in the top-left corner of the screen.
- Go for About This Mac.
- Click on Storage, in the horizontal menu, next to Displays.
- Hover with the mouse over each segment, on the storage bar, to find out what type of files are using the most storage on your computer. (System, Apps, Mail, Documents, iCloud Drive).
7 Ways To Free Up Storage On Mac
To solve this problem and manage to install macOS 11.0.1 on our machine we have applied the following tricks to free up space:
1. Mange Storage Feature
Use the Manage… button available in the Storage window that you opened above. Use the basic options to free up storage like Empty Trash and enable the Optimize Storage feature that automatically removes Apple TV movies and shows that you already watched. This storage saving option also remove old email attachments from your Mac.
2. Reduce Clutter
Click on the Review Files option, in the Reduce Clutter recommendation, provided by macOS Catalina. Your Mac will display the large files that take up a big chunk of your device’s storage space.
The top of the screen shows how much space Documents are occupying. Deal first with the Large Files.

If you own a removable disk, like an external USB stick or hard drive, you can transfer those files and store them externally, before deleting them.
Tip: You have to click on File Browser and locate the file. Right-click it and use ‘Show in Finder’ to be able to drag and drop the file to the desired location in your external storage source, that you just connected to your Mac. Copy & pasting is disabled in the Large Files section.
Proceed similarly with files listed in Downloads.
3. Store in iCloud
If you have enough iCloud storage available you can upload your files, photos and messages to your iCloud account and keep only recent files and optimized images on your Mac.
Fact: This option can free up lots of storage space, but it will require you to purchase an iCloud subscription to get enough storage to host large files.
Important: Even if you’re using the free 5 GB storage space, your Mac might keep a copy of that content. Here is what you can do:
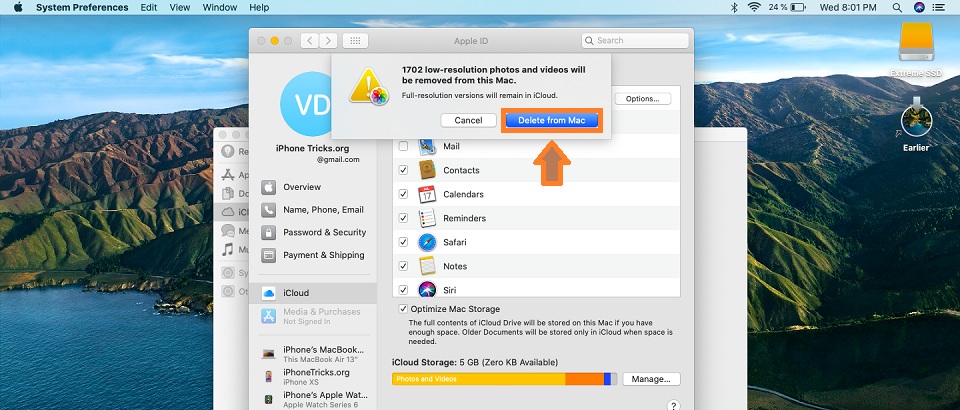
- Click on iCloud Drive (in the Manage Storage screen) and go for Open Apple ID Preferences…
- In the Apps on this Mac using iCloud, deselect Photos.
- Click on Delete from Mac, to remove the copy of your iCloud photos available on your machine.
- Opt for Delete from Mac, to confirm that you want to delete [number] low-resolution photos and videos will be removed from this Mac.
Tip: Check out the Apple One subscription bundle that’s a great option if you use multiple Apple services.
4. Delete Apps
Another way to free up storage for macOS Big Sur is to delete apps on your Mac. You can delete even the ones that you use often, because you can re-install them back after you finish updating to macOS 11.0.1. Although macOS Big Sur requires a total of more than 46 GB for the update to complete, a large part of this space is freed up at the end of the process.
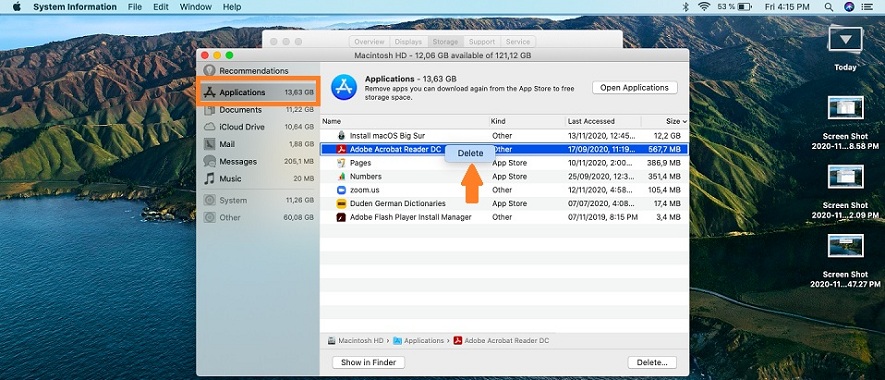
- Tap on Applications, available in the left sidebar, in the Manage Storage screen.
- Apps that are using the most storage space are listed at the top. Most likely the Install macOS Big Sur update file will be at the top of the list with 12,2 GB. Don’t delete it!
- You can delete almost anything else: Adobe Acrobat Reader, Games and any other apps until you free up enough space.
5. Remove Messages Attachments

Attachments in the Messages app can also take up lots of space. In the same Storage Recommendations screen, click on Messages. Select all files with Shift + Down Arrow and use the Delete… button available in the bottom-right corner of the screen.
Tip: You can export them to an external storage drive, if you want to be sure that you have a copy.
5. Delete Music
If you store songs and albums on your Mac, you might as well want to delete them because they can be serious storage consumers. No worries, you will be able to download them back as soon as the macOS Big Sur installation completes.
6. Remove Mail
The macOS stock Mail app can become a nightmare for your computer’s storage. You can’t delete the app, but you can disable all the connected accounts and remove mails and their attachments. No worries, you will get them back as soon as you reconfigure Mail in macOS Big Sur:
- Use the Finder tool to search for the Mail app and open it.
- Click Mail in the top-left corner of the screen.
- Select Preferences…
- Click on Accounts and disable each account.
Important: Use Finder and search for Library. Scroll for Mail. Right-click on it and select Move to Trash.
Tip: Empty Trash again.
7. How To Delete Other Storage
If you reached this step and you still get the macOS Big Sur not enough storage error, you have to tackle the Other Storage category. This section usually blocks a huge chunk of your Mac’s storage space.
The ‘Other’ tag contains system to files that don’t fit in the general file types. They can include cached files, old backups, app extensions, temporary files and installer package. Most of them can be deleted, however you have to be very careful.
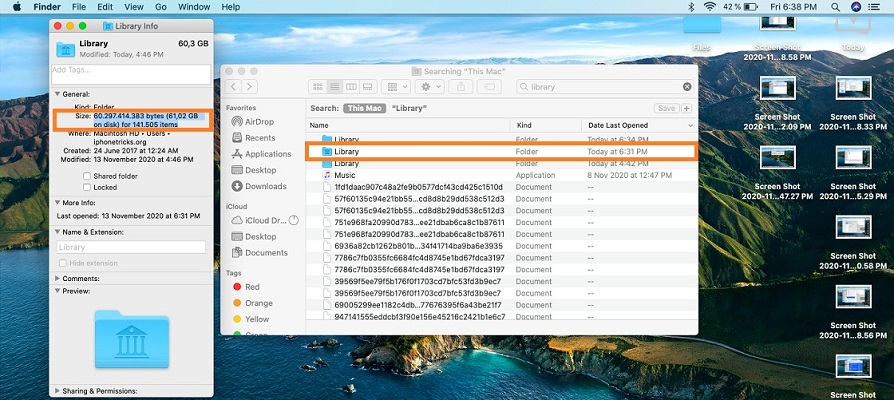
To check out files included in Other Storage you have to reach the Library folder again.
Open Finder -> Search for ‘Library‘.
Tip: If Library isn’t displayed when you search in Finder, select This Mac and filter. Your device might search by default for Recents.
It’s likely that you’ll find multiple ‘Library’ folders. You need to check the one that has a roman temple icon in the folder icon. Right-click and select Get Info to find out how much storage space the folder uses. If you get something like 62 GB you know that you’ve found it!
Fix: Use again the ‘Get Info’ option to check out folders from Library and pinpoint those that have a large size. Some of them might be Application Support, Caches, Cookies, Mail, Messages and others. See if you can find files that you can safely delete without affecting the good use of your Mac!
Do you have enough space now to install macOS Big Sur? Let us know if you managed to update or if you need additional help, using the comments section available below.
Updated (November 14)
8. Update From External Drive
If you applied all steps provided above and still couldn’t free up enough space for macOS Big Sur, you can attempt to upgrade using an external storage device, and save an additional 12.2 GB of space by copying the installation file to an external ssd and deleting it from the computer:
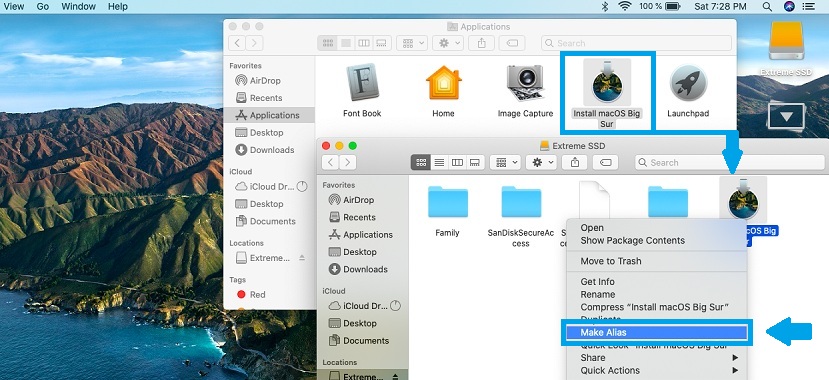
- 1. Download the macOS Big Sur installation file.
- 2. Open Finder and click on Applications.
- 3. Connect an external drive, like a Portable SSD, to your computer.
- 4. Copy the ‘Install macOS Big Sur’ file to an external drive.
- 5. On the external drive, right-click the recently copied installation file and chose ‘Make Alias’.
- 6. Copy the ‘Alias’ to your Mac computer.
- 7. Double-click on the Alias that links to the Installation File. macOS Big Sur will be installed from the external disk!
Credits: Special thanks to our reader Gremeaux L. for sharing this trick in the comments section.
Related: Now that you managed to update to macOS 11.0.1, it’s time to check out the most important macOS Big Sur new features!
I followed steps 1. 2. and 4. worked a treat, thank you.
Christina, thanks for confirming. Glad that we could help. Enjoy macOS Big Sur!
If you don’t have enough place on your MacBook Pro, follow these simple steps:
1 – Download the Installation File. It goes into Applications.
2 – Copy the file to an external drive.
3 – On the external drive, create an alias to that Installation File.
4 – Copy the Alias to the MacBookPro.
5 – Double click on the Alias to the Installation File.
The installation will be done from the external Drive.
GREMEAUX, thanks a lot for sharing this additional trick for installing macOS Big Sur on Macs with low storage. We’ll update it asap to the main content of the article, to make it even more visible to readers.
Basically your article was useless before this external tip was provided
gennnaro, thanks for commenting. That’s what we aim and stand for. We want to highlight problems and ask for the help of the community to pinpoint the best solutions. We test them out and highlight those that make a difference so that everyone can troubleshoot iOS, watchOS and macOS problems. There is no bigger joy, than a fix comes from a reader. Tech is too complex and unfortunately no one has a magic wand. ;)
Your comment seems to be useless. Obviously, if you need to free up to 35-45 GB, then the 12 GB installation file is only part of the equation.
Hi Gremeaux, after copying the Alias from my external drive to my Macbook Air 128 GB, I double-clicked on it to set the ball rolling. The update was verified from the Alias, but after that, I have not seen anything happening in the last 15-20 minutes. How long is this supposed to take? Is there anything else that I am supposed to do?
Anirban, are you stuck on a black screen? Can you please mention what Mac model you’re updating. There is a known issue with older versions of the MacBook Pro described here:
https://www.iphonetricks.org/macos-big-sur-update-black-screen-macbook-pro/
Hi Patricia, as mentioned earlier, I am using a Macbook Air 128 GB. I am not getting a black screen. Since the time that the update was verified from the Alias, there has been nothing happening so far. The external drive (a SATA drive on USB 3.0, not SSD) does show its indicator flashing from time to time, but that’s about it.
Anirban, sorry for missing your MacBook model. It was right in front of my eyes. :)
Have you get past this screen?
https://www.iphonetricks.org/wp-content/uploads/2020/11/macOS-Big-Sur-installing-on-Mac.jpg
What about the Restart one?
https://www.iphonetricks.org/wp-content/uploads/2020/11/click-restart-to-begin-final-stage-of-macOS-Big-Sur-installation.jpg
Will this method work with a 128G USB key? Thank you!
Life saver! Thanks a lot! I had to apply almost all tips including, installing from external ssd. Macbook Air 128GB
Mark, thanks for confirming. Glad we could help. How is macOS Big Sur?
Thanks a lot for help. made my day.
verdi, you’re welcome. Glad that we could help. Enjoy macOS Big Sur!
Didn’t work with connecting my hard drive, should I use a SDD?
Ana, yes you can try it. Let us know if you managed.
Questions from a noob: Can I not just reset the entire MacBook and then install It? Can I delete old system upgrades?
Also, How much space is actually freed up once the installation is completed and do I need to do anything myself to free up that space?
Sillia, thanks for your comment:
1. Yes, you can erase your Macbook using macOS Recovery mode. Make sure that you have important files backed-up.
2. After macOS Big Sur installation completes you shouldn’t see big differences compared to the free space that was available while your device was running macOS Catalina. No, you don’t need to free up space yourself. You can though, just double-check if the macOS Big Sur installation file is deleted. I’ve updated using an external SSD and removed the file before the installation to gain that extra storage needed.
I have tried to delete everything I could possibly find that wasn’t absolutely necessary. The amount of space available is different depending of whether you look at a Finder window, look ar About This Mac > Storage, look at About This Mac > Hardware > Storage, or use Disk Utility. Every method yields a different amount, from 18GB to 80GB free. I’ve been doing this for four days now, and this has got to be the worst upgrade I have ever encountered. I have a 2019 MacBook Pro with upgrade T7 processor and RAM. I didn’t opt for a bigger SSD because it is nearly always used in my office; otherwise when traveling, the 128GB is more than enough.
I knew when I bought it the hardware wasn’t upgradable; Apple didn’t mention the software wasn’t going to be upgradable either. Without a path forward, using this computer for another four or five years seems unlikely. A really poor investment in the long run.
Alan, thanks for confirming this issue. Everyone with 128 GB Macs, has big problems in freeing up enough space. In this case, a last resort would be to backup your important files, erase your Mac completely. This should free up all the space. Install macOS Big Sur and use backup to get your files back.
after I backup my computer. should I just erase my mac, install the update, then restore mac from previous backup?
I am working on step #7. Is there a trick to getting “Library” folder with roman temple icon to delete? I have right clicked and drug to trash and I can’t get rid of it!
Stephanie, thanks for commenting. I don’t recommend you to attempt to delete everything in the “Library” folder. The fact that it doesn’t provide the ‘Move to Trash’ option points out that it’s not recommended to delete it completely. Pinpoint the folders that take up the most storage, check out what they’re containing and delete them.
Tip: If you have an SSD around you can jump to Step 8. It will help you free up 12,2 GB without too much hassle.
Using an external storage drive worked for me, as described. I had to uninstall a lot of apps – but apps that weren’t too hard to re-install later. After updating, mercifully, I had slightly more free space on my hard drive. I was very worried that requiring 34gb of space would mean the OS would take another 34gb of space.
This was not the case. Your mileage will vary, but I went from 35.57gb of free space before installing (off an external drive) to 51.22gb after the update. The storage manager also let me delete a 3.3gb XCode cache I had no use for (I’m a developer so I do need XCode installed to utilize dev tools), too!
Kyle, thanks for sharing your macOS Big Sur update feedback. Glad that the external storage trick helped you out. Enjoy macOS 11!
I have followed the steps, created the Alias – however when I click on it to run the install it never opens, it just keeps bouncing down in my app bar. Any suggestions?
Jules, have you tried to restart your Mac and try again?
I copied the Mail folder in the Library to an external drive and deleted from the SSD, then installed Big Sur and copied the Mail folder back. All good.
Tom, thanks for sharing. Glad that it worked.
Hi,
If I chose to go the route of method 8 and use an external hard drive to update to Big Sur, will I have to plug in my hard drive every time I want to use my computer?
Jane, no. The hard drive is needed only during the upgrade process, to host the installer package. After the update is completed you can delete the installer package from the external drive and disconnect it.
I have been trying to reduce my disk space for about a week. Got it down to ~30 GB after deleting and removing all I could and was able to download Big Sur only to get the same message as others that there wasn’t enough disk space to install and I needed another 5 GB. I went back to try and delete more things and saw under Apps that the Big Sur file was taking up 12.2 GB. I made the mistake of deleting this (as I only stumbled across this article after the fact). I deleted the Big Sur file thinking I’d free up the 5 GB I needed and then tried to reinstall. I now get a message I need another 17 GB to install! It seems as though the second failed attempt to download Big Sur ate up a further 12 GB. Any idea how to fix this. I just lost 12 GB of data I need.
Big Sur, as stated in the article, requires lots of free space. Use the tips mentioned in the article to free-up space. There’s not much that we can add to the tips that there have been already provided.
So does Big Sur keep the 35Gb after installing or does that become free again? Is it just need to run the installation and then get it back? I have the 35Gb available but I don’t want to lose it all for the update.
That becomes free again.
Help! I’m stuck at start up without enough space to continue. What do I do now? My external time machine isn’t working either at this point. Please help!
Sorry missed your comment. Did you manage to find a solution?
Amazing. I finally found an advice that helped! Thank you
Thanks for confirming. Glad we could help!