How To Change The Apple ID Configured On Your iPhone
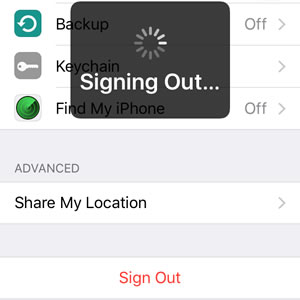
iPhone signing out from Apple account.
The Apple ID is easy to create and users that don’t own one usually open it, when they buy their first Apple product. Once you own an Apple account there is no need to ever change it unless you forget its password and can’t recover it, or simply need to change the email address assigned to it.
Why Is An Apple ID So Important?
This is an unique identification string that is used to register yourself and your device to Apple’s network of services. An Apple ID allows your iPhone to provide access to FaceTime, iMessage, App Store, iTunes Store and iCloud storage. It stores payment details, media files and much more. This is why its important to remove it from an iOS device whenever the gadget changes ownership!
How To Remove The Apple ID
 If the situation arises and you need to delete your Apple identification from an iOS device, follow the steps described bellow:
Step 1: Open the Settings app and browse for iCloud. Tap its label when you find it.
Step 2: On the iCloud settings page, scroll all the way down to the Sign Out button. Before you press it, do check if the Find My iPhone feature, listed nearby, is disabled. It has to be OFF, else you won’t be able to delete the Apple ID.
Fact: Do mind that your account password is required when altering the status of this setting!
 Step 3: Confirm your selection by tapping on Sign Out again! Do check the informative pop-up that unfolds from the bottom of the screen and be aware that: “If you sign out of your account, all iCloud Drive data stored in iCloud will be removed from this iPhone.”
Step 4: Now, decide what you want to do with the iCloud Safari data, reminders and News data available on your iPhone, when the Apple account is deleted. You can choose to keep it on your device or delete it!
Tip: If you’re changing from an old to a new Apple ID account and the iPhone remains in your possession, you can safely tap on “Keep on My iPhone”. Else if you’re selling or giving the gadget away, deleting the data would be a wise decision!
Sit back and relax for a few seconds, until your iOS device signs out from the current Apple account. When the process ends you’ll be redirected to the Settings app home screen.
How To Add An Apple ID
 1. Use Your Own: With the previous owner account removed, you can return to the iCloud settings label and log-in with your own account. Enter Username (your Apple ID email address), Password and tap Sign In. You’ll be asked if you wish to upload and merge your calendars, Safari data and contacts from this iPhone with iCloud. Express your will and that’s it!
2. Create A New One: If you don’t have an account, or you signed out of the old one, because you want to get a new one, tap on the Create a new Apple ID feature, available at the bottom of the screen. Follow the on-screen instructions and you’ll be ready in a few minutes.
Fact: Do note, that the email address you choose is also the final one. It can’t be altered at a later time, unless you repeat the above procedure and create a brand new Apple ID. So, either pick one that you plan to use for a long time or create a new one using the @icloud.com ending.