How To Shoot A Selfie In Portrait Lighting Mode On The iPhone X

Man snapping a Portrait Mode selfie with iPhone X.
If you upgrade to the iPhone X you should know that the front facing camera, which is included in the revolutionary TrueDepth system, is able to shoot photos with the effect of Bokeh. The front-facing camera features as 7 MP module and combined with the 3d sensing sensors and software editing can come up with stunning Portrait Mode selfies. You can even make these selfies even more spectacular with the help of the new iOS 11 Portrait Lighting feature that’s available for the iPhone 8 Plus and the iPhone X.
5 Steps To Take The Perfect Selfie In Portrait Mode
Here is how to snap selfies with the iPhone X:
 1. Open the Camera app, either directly from the Lock Screen, or by tapping on the Camera icon on the Home screen.
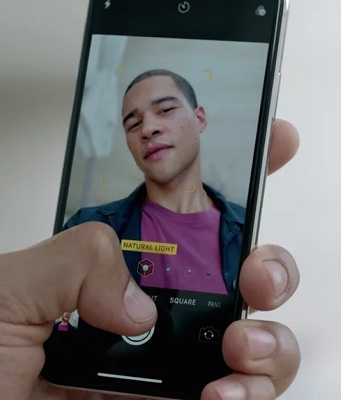
2. Swipe for Portrait Mode in the options scrubber, available above the shutter.
3. Tap the Camera switch icon, available in the bottom-right corner to switch for the front-facing lens.
4. Use the viewfinder to properly adjust the iPhone X in front of your face.
5. Shoot the selfie by clicking one of the Volume buttons!
Tip: You can select a Portrait Lighting effect before snapping the selfie. There are five spectacular effects to choose from: Natural Light, Studio Light, Contour Light, Stage Light and Stage Mono Light. Slide to switch between these effects and preview the potential selfie. If you like what you see proceed and shoot to picture. You’ll even notice that the actual selfie will look even better than the preview!
Tips For iPhone X Portrait Mode Selfies
1. Light source: When positioning yourself to take a picture of yourself make sure that the light source, no matter if its natural or artificial, is aimed towards you. The worst setup is to have the main light source behind you. It will generate poor quality selfies.
2. Hairstyle: The feature still needs improvements with edges. So, it would help if you style your hair to an even for factor. Messy hair will not be rendered good by the front facing portrait mode feature.
3. Deal With Glasses: If you wear glasses make sure that you use a slight angle. Else, they might get blurred out too.
How To Remove Portrait Mode Effect From iPhone X Selfies
If you decide later on that you prefer a clean selfie and want to remove the blurring effect you can do so by following these steps:
1. Open the Photos app from the iPhone X Home screen.
2. Browse for the picture that you want to edit.
Tip: You can find all images with depth effect in the Portrait album.
3. Tap the Edit option.
4. Now, you can either maintain the depth effect but switch for the standard Natural Lighting option from the carousel available at the bottom of the screen.
5. If you want to remove Portrait Mode completely, select Portrait, available at the top of the screen.
Fact: You can also add the Portrait Lighting effect, to a regular selfie or any other image available in the Photos app, by using the same steps provided above!
Related: You might also be interested to find out about the new Camera filters available in iOS 11!